
Lifestyle
Domestic Goddesses provides a holistic life style management service. We strive to assist you in creating a harmonious well balanced life though healthy eating habits, movements, home management, home décor and refurbishments.
We will consult with you about all your personal health and home needs and set out a program to relieve the stress of the admin responsibilities of creating a home environment that gives you respite from the stresses of living a highly functioning life.

Some thoughts about road trip food…
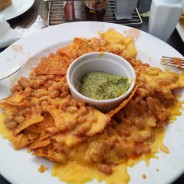
While I was on holiday over December, I had the expressed intention of switching off from food. I asked Adam to try, as far as possible, to keep me out of the kitchen and to stop me from seeking out every foodie spot or interesting restaurant on our journey. I think, for a foodie, I did pretty well – except that I don’t think I can eat another Greek salad for at least the next year.
I did have quite a few thoughts along the way, though, of how to make eating well (and vegetarian for Adam) on future road trips easier. For starters – padkos!
Padkos – (the food you take with you on a road trip) seems to be a thing of the past. I remember my mom packing large tupperwares of sandwiches on whole grain bread filled with egg mayo and watercress or hummus and marinated sundried tomato, carrot sticks, fresh fruit and flasks with hot coffee and tea. If we were lucky she would pack travel sized coke cans half of which she left in the freezer over night so they were cold for the second half of the trip. We would pull over at road side picnic areas and sit together enjoying the view, fresh air and stretching our legs.
These road side picnic places are all but deserted now and everyone stops at the petrol station convenience shops and restaurants. Burgers, pies, hot chips, chocolates, sweets and fizzy drinks. I am the last person to turn down good junk food, but when you are sitting in a cramped car for hours on end, junk food really does make you feel sluggish and queasy.
On the way back home from our holiday I was wise enough to plan ahead this time. I found a Woollies along the way and bought fresh avos, rye bread, pre-packed carrot sticks and cherry tomatoes. I also packed a tupperware with a leftover salad, which Adam had prepared extra of, the night before. I had take away cutlery, salt and pepper and a cooler box to keep it all cool.
We stopped off at a thatched road side picnic stop along the N2 past Riversdale somewhere and enjoyed a spectacular view over rolling fields and the fresh country air. We swore never to rely on Steers and Wimpy for road side food again!
I think I may spend a bit more time on the topic of eating well while travelling (as the extra kilos are still fresh on my hips). I am sure I can come up with a fun enjoyable solution here.
PS – Adam’s parents used to put raw breakfast goodies into a foil container and put that in the engine of the car. When they stopped a few hours later they had a piping hot meal! Now that sounds like a fun a experiment for me to try!
 |
|
|
It’s Friday, I can do what I want to!
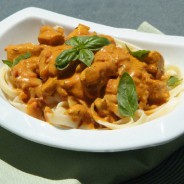
I’ve been meat free, wheat free and sugar free all week and it’s starting to lose it’s charm now… I want meat and I want pasta. Last year I developed a really quick and easy creamy chicken and tomato pasta on request of a client of mine. So I think I’m going to use today’s cooler overcast weather and the that fact that it’s Friday as excellent reasons to make this for my lunch today!

Creamy chicken and tomato pasta
Serves 4 – 6
400g of pasta of choice, cooked and drained
2 Tbsp of olive oil
1 large onion, finely chopped
1 tsp of paprika
½ tsp of garam marsala
½ tsp of turmeric
4 medium sized tomatoes, finely chopped
3 large chicken breasts (or 6 deboned skinless thighs), chopped into small bits
100g of tomato paste
250ml of cream (substitute with coconut milk for a dairy free option)
1 tsp of oregano
1 tsp of thyme
Salt to taste
Parmesan to serve (optional)
While your pasta is boiling, heat the oil in a medium sized pot and fry your onions until translucent. Add the spices and fry for a minute. Add your chopped tomato and chicken and fry until the chicken is almost cooked. Add the tomato paste, cream and herbs. Stir until well combined and salt to taste.
Serve on pasta with grated Parmesan.
Aubergine Masala
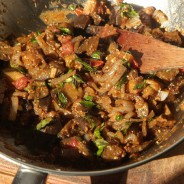
I have never particularly cared for aubergines, but lately I have more and more often been encountering aubergine dishes which have been really good. I think the secret for me is that they need to be cooked long enough to loose their spongy texture and go over to the soft creamy texture and nutty flavor.
Last week a client asked me to cooked a dish, among others, which she had gotten from a magazine (I don’t recall the magazine). It was fabulously spicy nutty creamy and moreish and I knew I would have to cook it for Adam as he loves aubergines and I hardly ever cook them for him.
I have modified the recipe a little taking the amount of spices called for down a little and have adjusted the method somewhat to make it a little easier, less messy and I have cooked it a bit longer to achieve that soft texture I like.
For my client the aubergine dish was paired with a grilled fillet, lemony crispy potato wedges and green salad.
I am really looking forward to my dinner tonight.

Aubergine Masala
Serves 4
60ml of Olive or sunflower oil (30ml first and then dashes as needed to prevent sticking)
2 medium aubergines, cut into large cubes
2 tsp (10ml) of mustard seeds
2 tsp (10ml) of cumin seeds
2 tsp (10ml) of garum masala
A pinch of saffron (optional)
1 medium onion, chopped
4 cloves of garlic, chopped
2 Tbsp of fresh ginger, finely chopped
Fresh chopped chilli to taste
1 tsp of salt (or to taste)
2 fresh tomato, chopped
Fresh coriander leaves, chopped (I didn’t have any so I used basil and mint from my garden)
On medium high heat in a large no stick frying pan or wok fry the aubergine until they have started to turn golden brown, about 10 – 15 minutes.
Add the spices and fry for a minute. Add the onion, garlic, ginger and chilli and fry for a further 10 – 15 minutes. You can add dashes of water while frying to prevent sticking or burning and this will speed up the cooking too.
Drop the pan to low heat, stir in the tomatoes, cover with a lid allow this to cook for a further 10 minutes, stirring every now and again to prevent sticking or burning. You can cook this for longer if the aubergines are not yet soft and creamy in texture.
Stir in the herbs just before serving.
Lunch with friends!
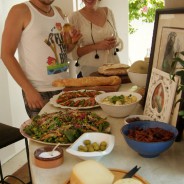
So it’s been all about healthy eating lately, but when I have guests over I do want to spoil them a little. I was having some of my closest friends and family over for lunch this weekend for a post honeymoon catch up. So I used this opportunity to keep with my fresh, light and healthy eating plan but decided to really splurge a bit on some fabulous ingredients.
For many reasons I tend to be a Pick n Pay girl, but I treated myself this weekend to a full woollies goodies lunch. Their fresh produce selection and quality really does give me immense joy. Well the menu went as follows (and was created while walking the isles):

Baby potato salad with watercress and a truffle saffron Caesar dressing

Caprese salad with pesto marinated buffalo mozzarella


I ended the meal with a platter of white nectarines, litchis and black cherries.

I don’t think I could have enjoyed the meal more if I tried! It was perfect for a lazy summer lunch. My guests seem to have agreed with me – as there was not a morsel left over!

Caprese Salad
Serves four side salad portions
3 ripe tomatoes
2 mozzarella balls (mozzarella di bufala or Fior di latte)
24 big tender basil leaves
For the dressing
½ clove of garlic, finely chopped
1 Tbsp fresh lemon juice
1 tsp of sugar
1 Tbsp extra virgin olive oil
1 Tbsp basil pesto
½ tsp salt
Freshly ground black pepper
Slice each mozzarella ball into 6 slices. Combine the dressing ingredients and rub the mozzarella slices in the dressing and set aside.
Slice each tomato into 6 slices (discarding the outer slices and removing the eye)
Using and appropriately sized platter, arrange the slices so that they are overlapping and fanned-out. Alternate between slices of tomato and mozzarella and a basil leaf between each slice.
Add some extra olive oil to the left over marinade from the mozzarella and then trickle that over the fanned-out salad.
Serve this with crusty bread as a light meal or as a side salad to a main meal.
Baby potato salad
Serves four side salad portions
400g of baby potatoes (the smallest you can find) boiled until tender and cooled
2 handfuls of watercress and some extra for garnish
3/4 cup of truffle saffron Caesar dressing *
In a mixing bowl add your cooked baby potatoes and gently squeeze them with a fork, just to break them open a little. You don’t want to mush them up, just to give them a little more surface area to pick up the dressing. Then add your watercress and your mayo and toss to combine. Serve them onto your serving dish and garnish with more watercress.
*Truffle Saffron Caesar Dressing
4 tsp lemon juice
2 tsp Worchester sauce
1 medium sized clove of garlic
1 large pinch of saffron threads
Salt and pepper to taste
50g of parmesan cheese
1 tsp of good quality mustard
1 large egg
60ml of olive oil
60ml of sunflower oil
30ml of truffle infused
In a stick blender jar blend all the ingredients together, except the oil, until smooth. Add the oil, place the stick blender to the bottom of the blender jar and blend pulling the blender slowly from the bottom of the jar up through the mixture. Then pump the blender around until the mixture is smooth and lightly thickened. If you want the dressing a bit thinner, add some extra oil (sunflower oil if you think the olive oil taste is too strong).
For a video on how to make mayonnaise please click here
Baby leaf salad with pan fried exotic mushrooms, asparagus and pistachio nuts
Serves four side salad portions
Two handfuls of baby salad leave
One handful of micro salad leaves
1 punnet of exotic mushrooms – sliced up, fried my way click here and cooled to room temp
1 punnet of mini green asparagus spears – blanched by submerging them in boiled water for a few minutes until bright green and slightly tender. Cool them under water and drain.
50g of raw shelled pistachio nuts
Assemble the leaves on a platter, scatter the salad with the asparagus spears, then the mushrooms and then the pistachio nuts. Provide a good balsamic vinegar and olive for dressing.
Quick fix meal in one salad!
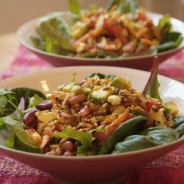
As I mentioned in my last post, we are trying to follow a post silly season sensible eating plan. I am pretty good at making healthy taste good so it hasn’t been that hard so far. We are missing the treats and snacking which seem to be synonymous with road trips and holidays, but chilled ripe mangoes and litchis have take the place of chocolates and deserts and flavoured rice cakes and corn crackers have taken the place of toasties and chips.
With Adam being a vegetarian I am always conscious about the protein content of our meals, and salads can easily fall down on non animal low fat proteins. But a quick fix salad I made the other day with things I had in the house really hit the spot for us. It was filling, delicious and totally satisfying not leaving us craving for sweet things later.
In a mixing bowl I added a tin of PnP four bean mix (which I drained and rinsed); grated carrot; chopped avo; chopped tomato; crumbled feta, toasted and lightly spiced omega mix seeds and some left over brown rice. To this I added a squeeze of lemon juice a dash of white wine vinegar, salt, fresh garlic, whole grain mustard, black pepper and a pinch of sugar. I tossed the ingredients together, tasted it to see if I liked the dressing (here is where you would adjust the seasoning) and then spooned that over a handful of my favourite baby Asian leaf salad.
It was delicious and considering how unglamorous the ingredients and method are, I think it still looked quite nice too.

Living vicariously!
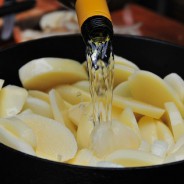
Adam and I are back from holiday and enjoying settling back into our happy home. As with all the best holidays we have returned with a bit of overweight, sadly though, not in our suitcases but around our waists. Since our return I have been preparing very lean, healthy and low maintenance meals. My old favs like potato and rice moosh, have featured, various dalh dishes and salads and of course my all time weigh watch winner, veggie juice. So all in all nothing that I haven’t already blogged about before.
But this does not mean that I can’t live vicariously! My mom told me about a braai dish she made for guests the other day which I insisted she send me pictures of and a recipe for.
Below is the amazingly simple and very soon to be tested by myself recipe!
Over to my Mom…
 |
|
Pictures care of Walter and Colleen Köppe |

How to negotiate a “braai” or a “bring ‘n braai” (ref. Gert Vlok Nel, troubadour and poet – “Die lewe is ‘n bring ‘n braai”) is what this is about. Arrive with an iron pot of “Chenin Blanc potatoes” and your reputation, will be saved, and you‘ll be able to eat something if you shoulder in early enough.
The iron pot is, for this version, fairly mandatory, because you’ll need to nurse it over the coals, for a good hour! This puts you right where the action is, beer clutched to the chest, smoke in the eyes, and talking a lot of stuff about a lot of stuff.
Quantities for about 6-8 people and a pot of ca. 40 cm diameter.
15 medium potatoes
3 large onions (optional)
1 bottle of Chenin Blanc (off-dry)
Salt to taste
250g good butter

Fricken’ fabulous veggie stacks
I am still on holiday! We have now spent time in Knysna, Kleinemonde, Hogsback and been up the wild coast. But alas, as with all good things we are winding our way back home now and have just arrived in the Tsitsikama forest for the final stretch of our trip.
On New Year’s Eve Adam and I cooked a very spontaneous dinner for the family which had unanimously been decided would be light and easy. We had all been eating non-stop and were feeling a touch overwhelmed at the prospect of another rich meal.
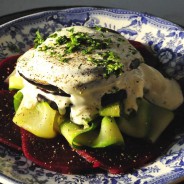
We did end up with four courses but each was small and light and well spaced out to leave space for chatter and chilled bubbles. The one course which Adam prepared (under my guidance) was a dish very much influenced by my mother’s cooking. I remembered her telling me about a meal she made last year, while visiting my brother in France, which was very similar. So I gave her a call yesterday and asked her if she could send me a guideline for her recipe and some pictures, which I knew my step dad had taken. The below is what she sent me.
 |
|
Pictures take by Walter Köppe |
The two interesting tweeks to this recipe are: 1) the aubergines are dry-fried, so not fatty at all and; 2) one can replace the crème fraîche topping with a slightly thinned hummus which can make this a vegan option as well as low-fat.
4 medium sized fresh beetroots
4 medium sized courgettes
1 Tbsp of olive oil
Roast the trimmed and washed beets for one hour at 175˚C until cooked through. Peel and slice into rounds of about ½ a centimetre.
Slice the aubergine width wise into 4 thick round slices and dry fry on medium high heat in a thick-bottomed non stick pan or griddle until scorched on both sides.

Gluten free bread, made easy by Angie!
As you might have guessed, I’m on honeymoon. I have also decided to take a much needed break from the kitchen and from any major online activity. Before I left, I did however, ask a few respected foodie friends and family to contribute guest blogs for me while I was away.
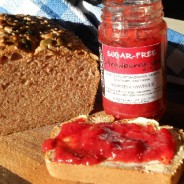
Today, I am posting a blog written by Angie Morrison, of SOMETHING DIFFERENT. She creates a line of unusual goodies such as green tomato chutney, sugar-free strawberry jam, rocket and cashew pesto (made with rocket from her garden J) and whisky marmalade. She is also a busy mother of two and her journey with gluten free bread baking has really caught my attention.
Gluten free baking is fiendishly difficult, but the gluten free living trend also seems to be becoming more and more mainstream nowadays. Angie’s recipe seems, on the other hand, to be really easy (as long as you have the right ingredients) and she has been gracious enough to share it with us.

Angie’s story and recipe
One innocent two-friends-having-breakfast-and-a-gossip some time ago, my friend revealed to me, as I was slathering some butter over my warm toast, that she had recently been diagnosed with a gluten and dairy intolerance. She was terrified of having to have to live a life without all her favourite foods – pasta, cake, cappuccinos, pancakes, muffins and worst of all, BREAD. In a moment of genuine concern for my friend I promised I’d help her out. In the famous words of Jeremy Clarkson “How hard can it be?”…
Six months and many tears of success and failure later, I have come to terms with just how hard it really is to make a decent, non-dairy, gluten free bread. Initially I researched the concept, like what was gluten and why was it so important for bread. It is literally the “glue” that holds the bread together.
So how do we overcome this? Firstly I had to learn a whole new language that makes up the gluten free world – guar gum, millet flour, tapioca starch to mention a few of the alien ingredients that are essential to successful gluten free baking.
And milk substitutes? Soy milk (sometimes not so yum), rice milk (which I learnt recently can have gluten in from the maltodextrin. Sigh!) and almond milk. Butter is replaced by oil (canola or olive), so now we are ready to make our bread. Or so I thought. Allergies, it would seem, come in threes or MORE. My friend couldn’t have soy or yeast either. What did I get myself into?
As a result of much experimenting I have finally come up with a couple of working recipes, one of which is truly a very tasty dairy free, yeast free, gluten free buckwheat bread. Despite its name, Buckwheat has no relation to wheat at all, but is related to rhubarb, the seed of which is ground up to make a wonderfully silky nutty flour. It has now become so popular I have started baking bread to order and also do premix packs complete with instructions.
Anyone who would like to contact me can do so at SDbyAngie@gmail.com. I welcome any suggestions and challenges.
So, six months later my friend is overjoyed that she can eat bread again. Now to make a gluten free, dairy free Red Velvet cake for her birthday… Oh Boy!

Gluten Free Buckwheat Bread
1 ½ cups of gluten free plain flour (see notes)
½ cup of buckwheat flour
1 tsp bicarbonate of soda
2 tsp cream of tartar
½ tsp salt
2 Tbsp castor sugar
½ tsp xantham or guar gum
2 egg whites
1 cup reduced fat milk or milk substitute of choice
1/3 cup canola or olive oil
3-4 Tbsp seed mix (flaxseeds, sunflower seeds, sesame seeds, pumpkin seeds to personal taste)
Preheat oven to 180˚C and grease a medium loaf pan. Sift together the gluten free flour, buckwheat flour, bicarb, cream of tartar, salt and stir in the sugar. Beat the egg whites until just frothy, and stir in the milk and the vegetable oil. Pour the egg white mixture into the flour mixture and beat for 2 minutes or until smooth. Pour the batter into the pan, and press the seed mix lightly into the batter. Bake for 40-50 minutes or until a skewer inserted in the middle of the bread comes out clean.
Notes:
For the gluten free plain flour you can use the Glutagon Plain Flour or this mix:
Angie’s bread flour mix 1:
1 cup brown rice flour
1 cup millet/sorghum flour
2/3 cup tapioca starch
1/3 cup cornstarch
Sift all together at least 3 times. Store leftover flour air tight container in the fridge or freezer.
Perfect imperfection.

I am sitting in the car as I write today’s blog. Adam and I are on our way to Knysna and this feels like the first time I have had the mental space and physical time to write, in at least two weeks. As some of you know Adam and I finally got married last week.
we got engaged a year and half ago and have been working out how we could get married with as little fuss and stress as possible. Having worked in the hotel and events industry for 10 years I do not labour under any illusions that traditional weddings are glittering magical blissful days.
We had played with various options this way and that (I even won a wedding for 20 people fully paid for) but all our considerations ended up back at the same place. Just him and I, two witnesses and a minister. And we almost got it right!
We got married on the morning of the 10th of December at our home with Adam’s brother and my sister as witnesses, a fabulous interdenominational minister and at the last minute a few dads, a skyped in mother and another brother. There was a lot of laughter, some very comical situations, beautiful words, tears and so much love.


We then nipped out for brunch with our two witnesses to our favourite eating space, Starlings. Adam and I then spent a few hours alone adsorbing the gravity of the bond we had just forged, while family and friends gathered at my sister’s house waiting to celebrate with us in the afternoon.
We were met by masses of bubbly, flowers, smiles, gifts, music, laughter, dancing and great food. It was the perfect amount of crazy happy to end off the reflective intimate morning. Echoing the words of the minster at our marriage – a perfectly imperfect day!
Chermoula and coconut milk baked fish
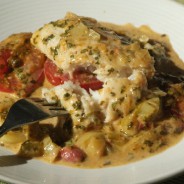
I developed this recipe earlier this week after a client requested a saucy fish dish. I was inspired after last weeks Moroccan explorations, so I decided to experiment with a chermoula, but I love the combination of coconut milk and fish too so I thought combining the two might be fun. I then saw a great recipe on Martha Stewart’s website with braised leeks and tomato with fish… and hey presto, this recipe was born. Not much else to say other than both times I have cooked it now, it has met with roaring enthusiasm by it’s eaters (and me).
Oh yes, I bet many of you are wondering what on earth chermoula is… it’s a spicy herby lemony Moroccan sauce which is great with fish, chicken and veggies. I imagine it would be awesome as a condiment with red meat or added to a marinade. Add a few spoons to a steak sandwich for a flavor sensation! It would probably be great in a salad dressing too.
So in other words make double what the recipe calls for below and keep the other half in jar in the fridge!


Chermoula coconut milk baked fish
Serves 4 – 6
For the Chermoula
2 cloves of garlic, roughly chopped
1 Tbsp of smoked paprika
½ Tbsp of ground cumin power
2 tsp of fresh ginger, finely chopped
½ tsp of fresh chilli, finely chopped
A pinch of saffron
½ tsp of ground coriander
3 Tbsp of lemon juice
¼ of a preserved lemon, fruit removed and roughly chopped
½ tsp of salt
15g of fresh coriander, leaves and tender stems only, well washed
10g of flat-leaf (Italian) parsley, leaves and tender stems only, well washed
Combine all ingredients, except the herbs, in a blender and blend until a thick, moderately rough sauce is formed. Add the herbs and blend to combine but allow there to be quite a bit of texture left in the herbs.
Remaining ingredients
2 Tbsp of olive oil
300g of leeks, thinly sliced
Salt and pepper to taste
4 plum tomatoes, sliced lengthways into thick slices
4 – 6 portions of firm flaky fish of choice, cut into medallions
½ a 400g tin of coconut milk or cream
In medium sized not stick pan, heat the oil and fry the leeks until tender. Add a dash of water if the pan becomes too dry. Season with a little salt and pepper.
Pre heat your oven on grill and place the wrack in the middle of the oven. In a medium sized casserole dish scatter the leek even in the bottom of the dish. Lay the tomato slices onto the leeks and top each slice with a dollop of chermoula. Place this in the oven and grill for about 5 – 10 minutes.
Pat your fish dry and lightly salt and pepper each medallion. Combine the coconut cream and remaining chermoula. Remove the casserole dish from the oven and place the fish onto the tomatoes. Pour the coconut mixture over the fish and bake in the oven for 10 – 20 minutes depending on the size and thickness of the fish.
Allow the dish to rest for 5 minutes before serving with rice, potatoes and a salad.


