Lifestyle
Domestic Goddesses provides a holistic life style management service. We strive to assist you in creating a harmonious well balanced life though healthy eating habits, movements, home management, home décor and refurbishments.
We will consult with you about all your personal health and home needs and set out a program to relieve the stress of the admin responsibilities of creating a home environment that gives you respite from the stresses of living a highly functioning life.

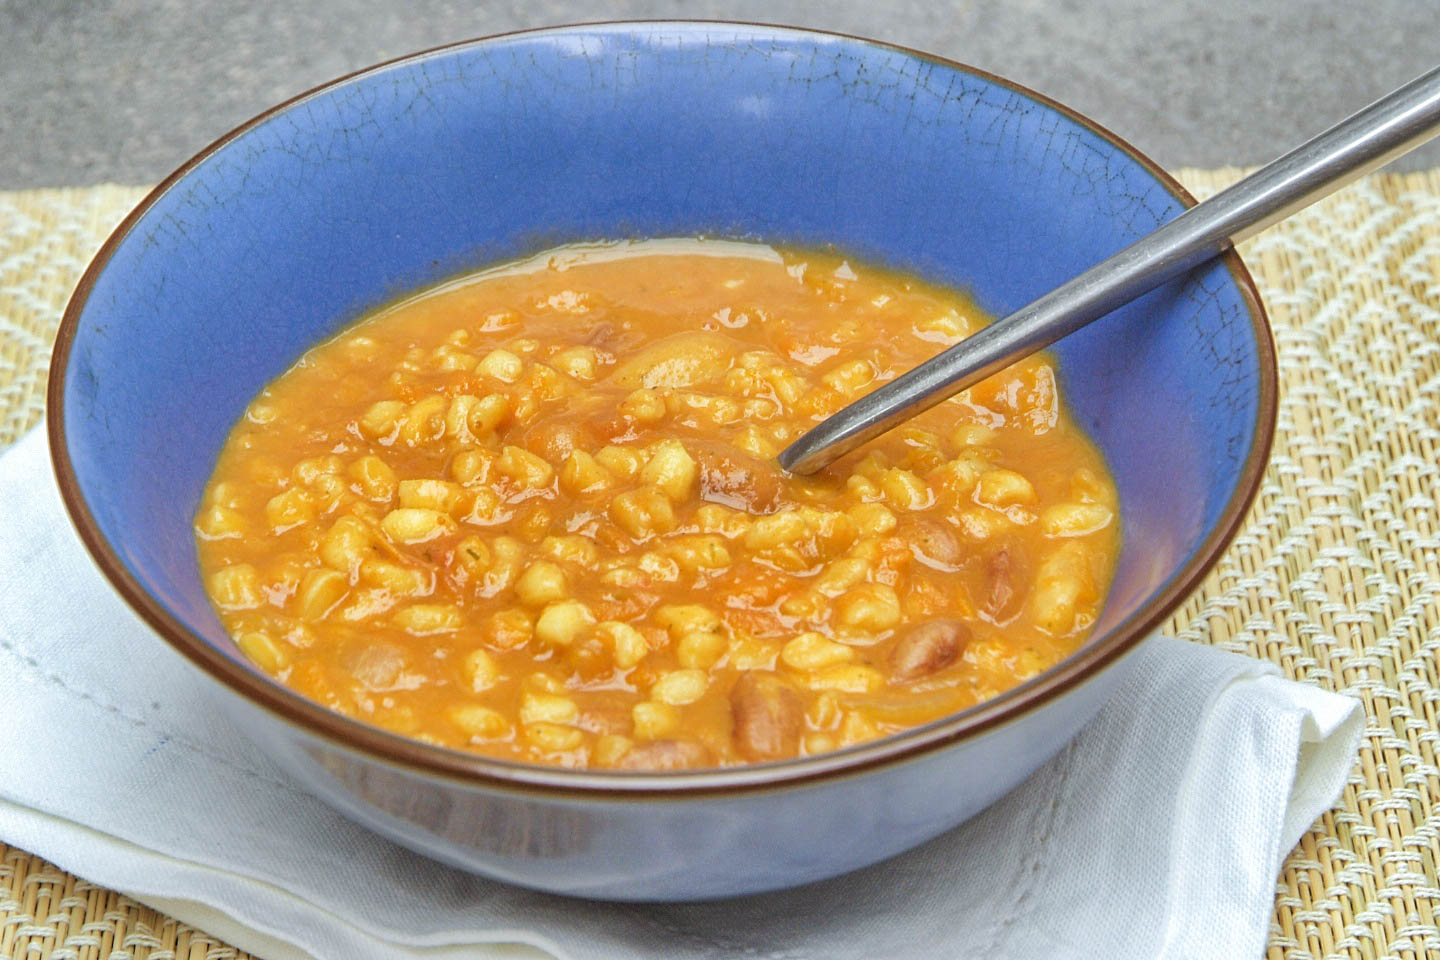
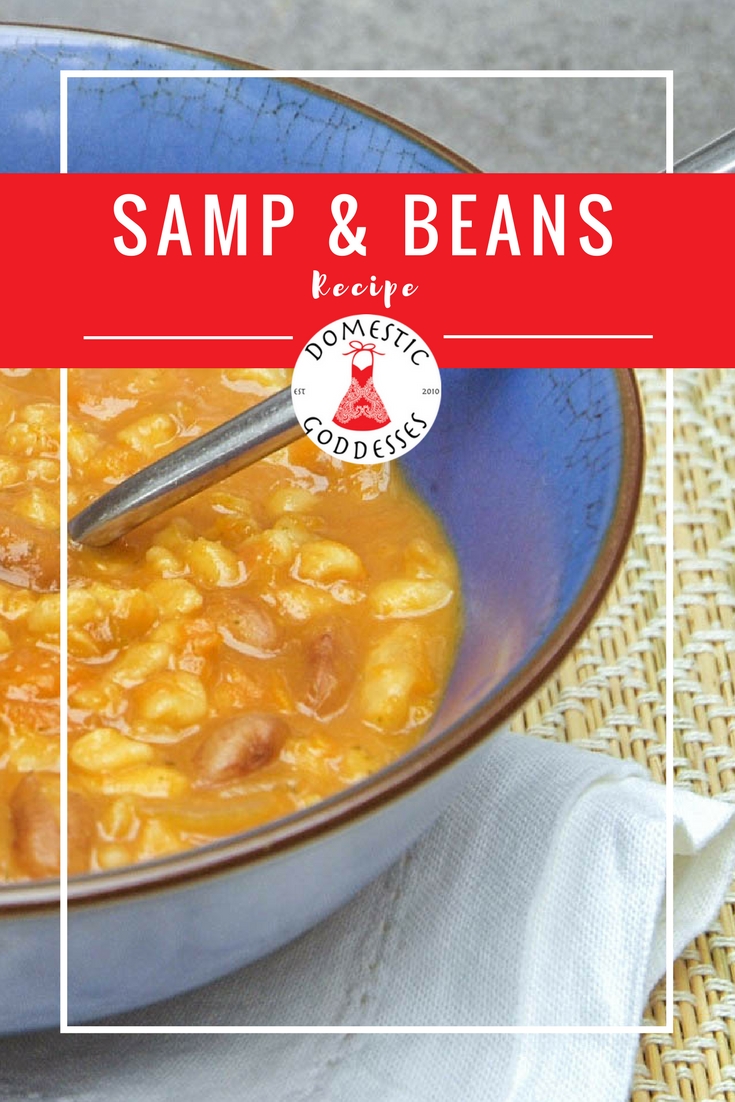
Samp and beans!

My love for samp and beans started long ago. My mother says it started when I was a toddler and I got a strep infection in my throat and mouth. Apparently, I refused to eat for about four or five days because of the pain. Eventually, the doctor said I should be sent to hospital so they could put me on a drip but our old farm hand, Sam, told my mother to hold off, he would get me to eat. He came back with a pot of very soft cooked samp and beans. I apparently loved this and because of the texture, it didn’t hurt my mouth. Consequently, I did not have to be sent to the hospital after all.
I believe Sam’s secret was to add a packet of Royco soup mix to the water – such a delicious way of how to cook samp and beans. I naturally have my own way and each time it will be different but the basic samp and beans recipe listed below is a winner. There are a few quirks but trust me they make all the difference.
For a meatier version (find my recipe for a meaty samp and bean stew here), it would be ideal to brown stewing meat or chicken pieces with the onions and slow cook it along with the samp. Either way, this is a warming rich tasting stew which is as old as the South African people themselves.
Recipe for samp and beans my way
Serves 6
1 Tbsp of oil
1 large onion, peeled and chopped
1 large garlic clove, peeled and chopped
250g dried samp and beans
100g extra dried sugar beans (or beans of choice)
1 litre of stock (veg, chicken, lamb, beef – ie. your favourite)
1 litre of boiling water
1 tsp of mild curry powder
1 ½ tsp of salt
2 large tomatoes, finely chopped
1 cup of butternut, peeled and cut into small cubes
1 cup of grated carrot
1 tsp of marmite
1 Tbsp of tomato paste (optional or you can use tomato sauce)
1 Tbsp sugar
1 Tbsp peanut (or another nut) butter (I know this sounds odd but it is amazing)
Gently heat the oil and fry your onions and garlic in a thick bottomed medium sized pot. If you wanted to add stewing meat or chicken pieces, now would be the time to brown your meat. Add the samp and beans and cover with the stock and boiling water. Add the curry and salt and simmer. Chop, dice and grate the veggies and add them to the pot and simmer for about one and a half to two hours on low heat. Check on it every so often and add boiling water if needed.
Once the samp and beans have softened add the marmite, tomato paste, sugar and peanut butter and simmer for a further 15 – 30 minutes stirring every so often to ensure that it doesn’t stick to the bottom of the pot and until it gets a lovely saucy consistency.
I freeze portions of this for quick meals and it freezes beautifully.
Looking for a meaty version of these classic samp and beans? Check out this recipe!
Pin for later!

Beware of the Butterfish!

Oh my goodness, I poisoned my housemate yesterday! I cooked butterfish for lunch and he had a really bad reaction to it. I did warn him before serving it to him as I am aware that some people react badly to it but have personally never experience the reaction. Sorry, James!
Anyway – if you do plan on eating it and have never had it before be aware that you could react badly to it. You need to start with a small amount to see if you do react. I have pasted a link below with the symptoms:
http://all4women.co.za/health/daily-health-tips/nutrition-health-tips/beware-butterfish.html
I however love it but will most certainly not serve it to a guest again!
Anyhow, you can do this recipe with the fish of your choice… so let’s get back to it then.
I was having a bit of a comfort food day yesterday. The weather was balmy but distinctly autumn. I had been meaning to recreate a sauce for fish which I made while I was in Stilbaai last week, which got rave reviews. So I defrosted the butterfish steaks which I had bought from the Breco factory shop and went about putting together some appropriate side dishes.
As usual I didn’t feel like leaving the house to shop the few things I needed, but decided to make do with what I had in the house. This is a theme in my life and I have come up with some of the most amazing dishes and ideas from simply being creative with what I have.
So let’s break the meal down. Butterfish as mentioned from Breco. A lemon, garlic and herb butter for the fish. Creamy mashed potato with roasted garlic and goats cheese. Roasted onion and butternut with baby rosa tomatoes.
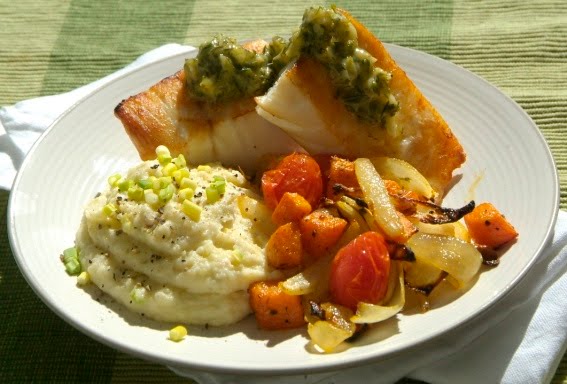
Butterfish – I left it completely plain, just defrosted it and grilled in the oven on searing high heat for 8 min on each side, switched the oven off and let it rest for about 5 mins then let it rest for a further 5 mins out the oven, while assembling the other dishes on the plate. The timing needs to moderated according tp the size of the pieces of fish. Mine were pretty big pieces and butterfish is both dense and oily.
Lemon and herb butter – in a sauce pan I added a handful of chopped fresh herbs from the garden (basil, chives, rosemary and mint), I also added some of the Woolies freeze dried herbs (dill and thyme), peeled and finely chopped a little ginger and garlic, lemon zest and juice, salt and butter. If you have capers (which I did not) they would also go well, as would fresh chilli. I melted that together and left it off the heat for the flavours to draw.
Creamy mash – this was a bit of a travesty in that I really went into over kill here… but the final result was really delicious but seriously rich. I cooked ¾ regular potatoes with ¼ sweet potatoe. I roasted some garlic in the oven which I added to the cooked potatoes before I mashed them. To the mash I added some butter, crème fraiche, wasabi mayo (from woollies), soft goats cheese from Fairview, a dash of milk to thin the mash, salt, pepper and chopped spring onions.
Roasted veggies – I chopped up butternut and onion with I tossed with a dash of olive oil, salt and little curry powder and put it in the oven on grill but quite low down in the oven. Once the veg had half cooked I add a handful of rosa tomatoes and tossed a little sugar over the veggies. I removed the tray once the tomatoes had just burst.
It was a rich creamy dish bursting with flavour and decadence. I had to have a little lie down afterwards! But would be great for a cold autumn weekend luncheon or dinner.
Rusks – baking vs. buying?
Who in South Africa does not love rusks? Next to biltong I think they are right up there with truly South African passions. Sadly, because I do not have a moderate bone in my body, I very rarely buy them. If there is a packet in the cupboard they will weigh on my mind (and my lips) until they are finished. I have brought this topic up today because my house mate has a box of rusks on his shelf which are luring me like so many sirens to the ultimate demise of my self control… before I traverse the personal space boundaries and scarf down his supply, I may need to bake or buy a batch.
The baking vs. buying debate is applicable here as the smell and taste of home baked rusks are a happy place for me, but they are a bit of a mission time wise because of the drying process. One can however leave the house while the rusks are drying as they are on such a low heat they couldn’t really cause any damage, but I’m not a fan of leaving my oven on while I’m not home and know that a certain level of anxiety would accompany any commencing activity. Okay I’m rambling here now.
I blogged about rusks a looong time ago, as at the time I had been wrestling with the dilemma that all good rusk recipes are loaded with calories and fat and I was on a mission to create a healthier rusk recipe. If you doubt what I am saying, take a look at the nutritional info on your favourite rusk packet and compare it to a chocolate slab’s nutritional info… just because it says it has bran or muesli in it, doesn’t make it healthy!
I did come up with a pretty viable health recipe which cut the sugar in the average recipe down by 80% and added loads of fibre. for the recipe, click here.
If I find that I am too lazy or strapped for time to bake my own rusks, there is almost only one brand of rusk I will buy (if I have the choice) and that is the Bags of Bites – sugar free, wheat free rusks – I know that sounds scary but take my word for it. They are packed with goodness and flavour and at the same time cut down on the guilt!
What is not to love? Just make a mental note, they do not say anything about being fat free and from experience I know that there are many things you can successfully cut out of a rusk recipe, but fat is not one of them!

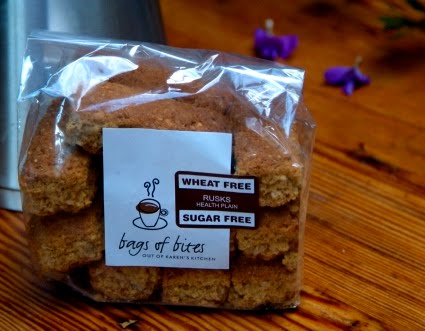
Can’t wait for my hot cup of coffee and chunky rusk fantasy to come true today and am pretty sure bags of bites is gonna win the battle of wills.

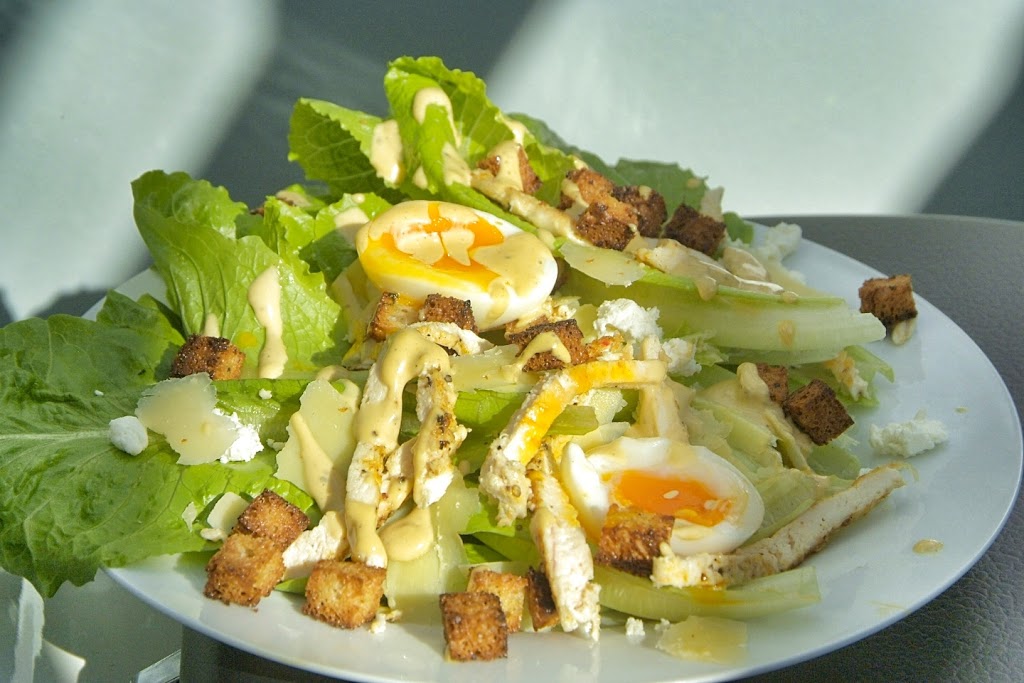
Caesar salad

There has been loads of talk about Caesar salad in my life recently and then my cousin mentioned that she had a great Caesar dressing recipe where you briefly boil your egg before making the mayonnaise dressing which intrigued me. It is supposed to make the dressing creamier. So on this lazy Sunday afternoon, I threw together two Caesar salads… (which, I might add, I have never made before).
I really loved the dressing and have eaten the leftovers of it on a pizza, on rice and on pasta since then… seriously good. I would, however, like to add an anchovy next time (I didn’t have any but I like the salty tangy flavour they add).
The rest of the salad was good in theory but I over baked (euphemism for burned) the croutons and didn’t wash the lettuce (rooky error). So with a little more care than I gave it, I think this is a salad which deserves to be blogged about today and will most certainly be remade soon!
Please send me other tips and recipes for Caesar salad if you have any exceptional ones. I added grilled chicken and goats cheese to mine, cause I had them in the fridge and wanted a meal replacement salad. The chicken is a great addition but the goats cheese didn’t add much to the salad.
|
|
|
Yes, I know the salad is a mess but it really was a lazy rainy day. |
Caesar Salad
Cos or romaine lettuce (washed and dried)
Parmesan shavings
Optional (but traditional) – anchovy fillets
Optional – grilled chicken breast pieces
Optional – boiled egg, quartered
Garlic croutons*
Caesar dressing*
*Garlic Croutons
Cut up cubes of bread (bread of choice), I use about a cup of bread (about 1cm squared cubes) per person.
Toss with a little-crushed garlic, salt and olive oil and bake spread out on an oven sheet until crispy (about 200˚C for about 10 minutes). Keep a close eye on them, as they burn easily.
*Caesar Dressing
Makes about ½ a cup of dressing
4 tsp of lemon juice
2 tsp of Worchester sauce
1 medium sized clove of garlic
1 anchovy fillet (optional)
50g of parmesan cheese
1 tsp of dijon mustard
1 x 45 sec boiled egg (egg boiled for 45 seconds)
1/3 – 1/2 a cup of a mild grassy olive oil (sunflower oil is also good)
Salt and pepper to taste
In a stick blender jar blend all the ingredients, except the oil and seasoning, together until smooth. Add the oil, place the stick blender at the bottom of the blender jar and blend pulling the blender slowly from the bottom of the jar up through the mixture. Then pump the blender around until the mixture is smooth and slightly thickened. If you want the dressing a bit thinner, add some extra oil (sunflower oil if you think the olive oil taste is too strong). Season with salt and pepper. You can also add more lemon juice, mustard or Worchester sauce if you feel it needs it.
Now arrange your salad leaves. On top of that arrange the other salad ingredients. Scatter with croutons last and then dress just before serving.
The Royal Wedding…

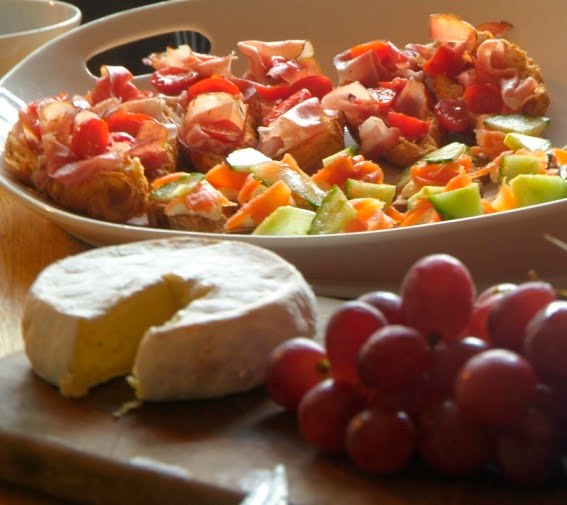
I had a bit of a rushed morning with errands and work, all of which needed to be finished before my date to watch the royal wedding at 12h00! I naturally wanted to have some nice snacks and bubbly to accompany the wedding watching but had neither the time nor inclination (after the last week of nonstop cooking) to prepare anything fiddly. So I popped past Giovanni’s, picked up some Parma ham, smoked salmon and Le Petit France camembert and few other goodies, popped past woollies to get rye bread, croissants, crackers, crème fraiche, grapes and mini lemon cheese cakes.
I arrived at my Dad’s house at 11h45, so very little time to spare before missing the good stuff. So the snacks were banged out in literally 10 minutes. Croissants with parma ham and cherry tomatoes, rye bread toast squares with crème fraiche, smoked salmon and cucumber triangles and a cheese board with grapes and crackers. It was quick easy and simply delicious. My three favourite things when it come to food!
The wedding on the other hand was stiff, formal and left me wanting for some serious romance… I guess there was loads of protocol to follow, but a little bit of romance and some kitschi’ness would have gone down a treat. The royal family is almost purely there for the entertainment of the british people… come on then, give us a little schmaltz please!
How awesome was the bridesmaid’s dress though?

I’m back!!!!

Okay…. I’m back! Wow – what a whirl wind week… but what a fabulous experience. 29 eager eaters to feed with good solid family food, just the way I like it! Great ingredients, simple recipes and lots of love and laughter (and bubbly). I tried a few new things which I will share with you over the next few weeks and recreated a few of my old faithfuls which were very well received!
But sadly… I’m not going to be able to post a recipe right now either, as I am hairing of to watch the royal wedding… and have bought parma ham, smoked salmon and an array for gorgeous accompaniments to go with it… will take photos and report back soooon!


Cashew nut, fig, pomegranate bread pudding

Today is a mad rush for me as I’m prepping for a private cooking job, 29 people for 7 days out in Stillbaai, starting tomorrow. Man, I have a lot of shopping to do!
I probably won’t get to my blog while I’m away (promise I’ll try, though) but will tweet and facebook from my blackberry, so if you’re not linked – my FB page is Domestic Goddesses, ‘like’ it and you’ll get my updates. My twitter page is @theklaschwager – will be chirping and FB’ing about the trials and tribulations as I work.
I experiment with a bread pudding recipe yesterday which I plan to make while I’m away and thought it was worth sharing with you. The recipe is a product of what was in my fridge at the time but I think it is a good combination of flavours. I spread the bread with cashew nut butter and sprinkled it with fresh pomegranate seeds and chopped up fig preserve before pouring over the custard which I had flavour with vanilla, cinnamon, all spice and ground ginger. It sounds like a lot of flavours but they worked really well together. I had thought that peanut butter and apricot jam could also make for a killer bread pudding… well, we’ll see what I come up with while I’m away.
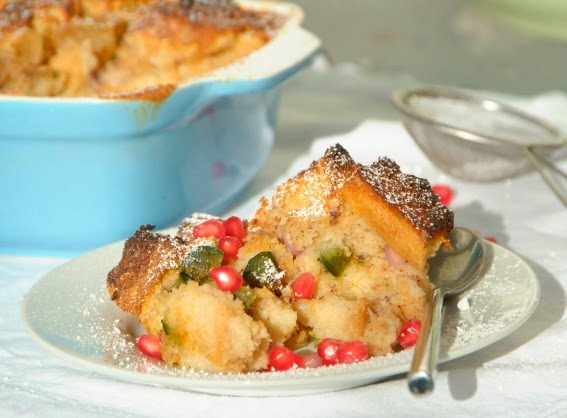
Cashew nut, fig, pomegranate bread pudding
Serves 6
8 slices of white bread (I used Albany’s best of both)
8 Tbsp cashew nut butter (or the nut butter of your choice)
2 fresh figs or 2 preserved figs, chopped into small bits
½ a cup of fresh pomegranate seeds
3 eggs, separated
½ cup of castor sugar
2 tsp of vanilla essence
1 tsp of cinnamon
½ tsp of ground ginger
¼ tsp of all spice
¼ tsp of salt
2½ cups of milk
Spread each slice of bread with cashew nut butter and cut into cubes. Scatter the cubes into a casserole dish the correct size to hold all the bread. Scatter the figs and pomegranate seeds amongst the bread.
Pre heat the oven to 150C˚, place the wrack in the middle of the oven and boil a kettle full of water.
In a large mixing bowl, whisk the egg white until the just start to thicken, add the castor sugar in parts while whipping and then the vanilla, spices and salt. Add the milk whip briefly to combine and pour immediately onto the bread cubes. Pull the cubes aside a little with a fork, so the mixture can run into all the gaps. Try to get all the cubes soaked with the egg mixture and push the cubes down all little to get the bread to absorb as much of the mixture as possible.
Place the casserole dish into a roasting pan and fill the roasting pan with the boiling water until it’s about ¾ of the way up the casserole dish. Place this into the oven and bake for 45 min to an hour. You want the top of the pudding to be crispy and the egg mixture to be cooked through. Check this by piercing the pudding all the way through with a knife and checking if it comes out clean. If the top isn’t crisp, turn up the heat for a few minutes to brown it.
Serve immediately with ice cream, custard cream or fruit compote. This dessert can be re heated but it taste best when straight from the oven.
Prawn Arrabiata Pasta in less than 10 minutes!

I have a love / hate relationship with sea food. I enjoy really well prepared sea food but I hate the fact that no matter how often I try I never seem to be able to prepare it as well as I would like, myself. I guess that’s not really the right way to introduce my new sea food recipes is it…? Well, that said, the recipes I do love and use are therefore almost fool proof, very easy and super delicious.
You really can’t get easier than this prawn arrabiata pasta. It’s a dish a friend of mine has been making for years and with two small kids, a full time job and a love for entertaining this dish has proved itself over and over again. We, her guests, love it!
I have made this a few times when I had last minutes guests coming and was working late. The sauce is finished before the pasta has finished boiling – it’s that quick and it’s a total winner.
You needn’t use arrabiata sauce (especially if you have kids eating – it has chilli in it), you can use a plain Neapolitan sauce or whatever your favourite ready-made tomato pasta sauce is. I used an Ina Paarman Tomato, green olive and chilli pasta sauce as it looked yummy and I wanted to try it. It was great, highly recommended!

Prawn and tomato pasta
Serves 4
400 – 500g Tagliatelle or Linguine, prepared according to packet instructions.
800g of read made tomato pasta sauce (freshly made sachets or bottled)
500g Prawn tail meat, shelled (frozen or defrosted)
100g parmesan, freshly grated
Fresh chilli chopped (optional)
Start your pasta cooking. In a pan on medium high heat warm you pasta sauce, add you prawn meat and bring to a simmer. Cook for a few minutes until the prawns are cooked through. Set aside until ready for use.
Drain your pasta, toss with a little olive oil. Serve onto a platter or into pasta bowls, top with the sauce and lots of freshly grated parmesan and fresh chillis.
Tip
It astounds me how many people struggle to get their pasta not to stick together when cooking it. Once the water is simmering, hold the pasta in a bunch and place it down to the center of the pot, allow it to fan out as shown in the picture below. After a few minutes gently push the tips of the pasta down until the pasts has submerged. Place the lid on the pot and in a few minutes stir the pasta around the water a little ensuring that the hot water has coated all the strands. Cook and drain. Toss with a little oil to ensure that no further sticking occurs.

Monday guilt…

This morning I am having serious food guilt issues. I have not cooked once in 3 days… but I have stuffed my face all weekend with a long list of foods ranging from the sublime to the ridiculous (erring more towards the ridiculous).
The weekend started at the opening of a new restaurant in Hout Bay called La Cabane (I’m sure I’ll get to reviewing it properly soon), then on to the April special at La Mouette (6 course tasting menu at R120, so good!), Saturday morning MacDonald’s hangover breakfast (doctors orders, I promise), Waterkant Market with Hemelhuijs potato wedges topped with truffle mayo washed down with two Brewers&Union beers (the unfiltered and the Berne – this could be long love affair begging), then for dinner KFC box master and loaded fries (Oh yes!) and a Tournado ice cream. Sunday brunch Milo Pops and Nik Naks followed by an early dinner of a Spur rib burger and baked potato with sour cream and chives… (in my defence here – we did do a 3 hour hike in the mountains just before dinner).
I’m not actually sure that I should be admitting to all this, but perhaps a name and shame is needed in this case. Let’s air the dirty laundry and make all kinds of Monday promises and commitments because tomorrow is the official opening Massimo’s Pizza club and I don’t want any residual guilt for that!
So today I am doing my fresh pressed veggie and fruit juice, home-made whole grain toast with marmite and am thinking of low fat dinner options. I am leaning to towards a baked potato. There is something very wintery and comfort foody about baked potatoes for me and I think they would make a great Monday meal, simple and satisfying.
I did a training session the other day on how to make the best crispy baked potatoes (something I learned from and Irish friend of mine when I was about 8 years old) and then three toppings for them. I’ll give you all three toppings I trained, below. There is one really healthy, one medium fat and one downright decadent. But each one is delicious in its own right and very much worth trying them all!
How to bake perfect crispy skinned potato
Pre heat your oven to 180C˚, placing the wrack in the middle of the oven. Thoroughly wash each potato ensuring that all sand is cleaned off. With a fork scrape the potato from end to end, just piercing through the skin and into the flesh. Rub a mixture of oil, salt, herbs and spices into the groves in the skins of the potatoes. Place the potatoes into a roasting pan with enough space for the potatoes to get even heat all around.
Bake the potatoes for 45 minutes to an hour or until the skins are crispy and the potatoes are cooked through. You can check this by sticking a sharp knife into the centre of the largest potato to see if it runs through easily or not.
Toppings for baked potatoes
Finely chopped tomato, cucumber, carrot and sweet corn with creamy cottage cheese and yoghurt dressing, topped with toasted seeds
Tops 4 medium baked potatoes
2 tomatoes, chopped
¼ of a cucumber, chopped
2 medium carrots, chopped
1 cup of sweet corn, defrosted if frozen blanched if fresh
250g of cottage cheese
2 Tbsp plain yoghurt
Salt and pepper
½ cup of omega seed mix, toasted in a pan with oil, salt and some spices
Finely chop up the tomato, cucumber, carrots add the sweet corn. Mix in the cottage cheese, yoghurt, salt, pepper and toasted seeds (leaving a few for garnish). Spoon on top of the baked potatoes and top with a few toasted seeds.
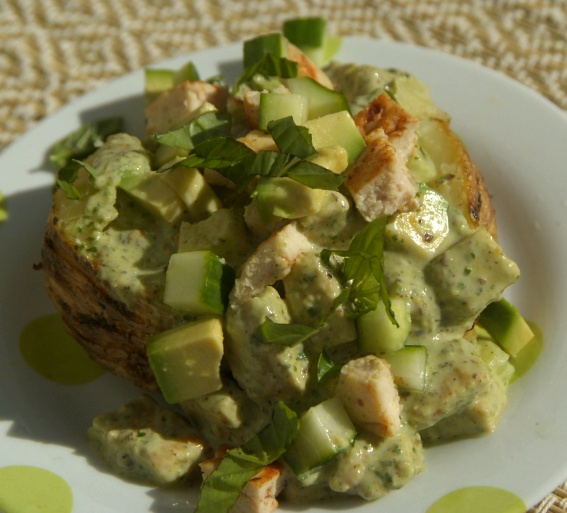
Chicken, avo, cucumber with pesto, chutney, yoghurt dressing
Tops 4 medium baked potatoes
3 chicken breast, tenderised
1 ripe avocados, peeled and diced
300g of plain yoghurt
100ml of basil pesto* (bought or home-made)
50ml of peach chutney
Salt and pepper
Rub your tenderised chicken fillets with oil, salt and chicken seasoning of your choice. Fry in a searing hot pan for 2 minutes on each side, until just cooked through. Set aside until ready for use.
Combine the yogurt, pesto, chutney, salt and pepper. Add the chicken breast chopped into bite sized pieces and the avo. Mix lightly and spoon over hot baked potatoes.
*Basil Pesto
Makes about a cup of pesto
50g of macadamia nuts (or the traditional pine nuts if your budget allows)
1 clove of garlic
125ml of olive oil
50g of parmesan cheese (or similar – pecorino, grana padana)
80g of fresh basil
Salt to taste
Blend the nuts, garlic, olive oil and cheese together to form a paste. Add the basil and blend until just fine, but don’t over blend, Add salt to taste.
Mushroom sauce with crispy bacon bits
Tops 4 medium baked potatoes
½ packet of streaky bacon
2 Tbsp of Olive oil
250g of mushrooms, sliced
¼ tsp of salt
¼ tsp of black pepper
1 Tbsp of soya sauce
3 Tbsp of flour
2 cups (500ml) of milk
Fresh herbs if you have some
Lay your bacon on a baking tray and grill in the oven until crispy. Fry the mushrooms in a large pan over medium high heat until they have reduced by at least half. Add the salt, pepper and soya sauce and fry until the mushrooms start browning.
Add the flour and fry a little until the flour has coated the mushrooms. Remove from the heat, add the milk and stir until all the ingredients have mixed well. Return to the heat and stir until the sauce has thickened. Add fresh herbs if you have any. Chop the bacon into pieces and add to the sauce and spoon over hot baked potatoes.
Chicken Tikka Masala ‘Lite’

I am inordinately fond of curry. I love it hot, mild, saucy, dry, piquant, mellow, robust… Thai, North Indian, South Indian, Cape Malay you name it, if I haven’t tried, just hang on I’m getting there.
The inspiration for today’s curry was taken from the recipe book ‘Cook Yourself Thin’ (I like that idea). I really enjoyed the ethos of this recipe book. The basic principle is not to change the way you eat but to understand and know your eating patterns and habits; to have a basic understanding of the caloric make up of food in general and then make a few savvy decisions about what to cut out, cut down or substitute, making room for the things you can’t live without. That works for me.
Chicken tikka masala is said to be the modern day national dish of England and at approximately 1055 calories per serving (without the largers) it’s pretty rich. This recipe halves the calories by substituting the butter and cream with lite coconut milk. I did cheat a bit and added a spoon of cashew nut butter (my latest fetish*) but naturally that would be totally optional. I loved their spicy rice too – have been making it with other dishes now.
* Komati food has a range of raw nut butters for a fraction of the price as most health stores. They are GREAT on oats, in smoothies, in curries and they add depth to most sauces in general. I added some to Thai fish cakes and it was sensational. Peanut butter is good too, but it has a very distinctive taste and can be a bit over powering at times.

Chicken Tikka Masala ‘Lite’
Serves 2 generous portions
For the chicken
2 chicken breasts (Elgin free range all the way)
2 Tbsp of tikka masala powder (or paste I guess)
2 Tbsp of plain yoghurt (fat free or low fat)
1 clove of garlic, minced
½ tsp of salt
I was in a rush so I tenderised my chicken with a meat mallet, cut it into 6 large chunks per breast and rubbed it with the paste made from combining the other ingredients. Then I left it in the fridge while I prepped the other stuff (see below). The recipe didn’t tenderise the chicken and left it marinating in the fridge over night. Your call.
Pre heat your oven to 220C˚ and place the wrack at the top of the oven.
When you’re ready i.e. about 10 mins from finishing the dish, place the chicken in the oven and bake for about 8 minutes if you’ve tenderised and 10 minutes if not or until it’s just cooked through and browned.
For the rice
1 cup of basmati rice
2 ½ cups of water
¼ tsp of mustard seeds
5 curry leaves (I bought dried ones)
1/8 tsp of cumin
1/8 tsp of turmeric (the recipe called for saffron but I didn’t have any)
½ tsp of salt
A few small cinnamon stick pieces (use a little ground if you don’t have the stix)
Add all the above into a small pot (heavy bottomed if possible). Simmer for 8 minutes with the lid on until still wet but most of the water adsorbed. Then remove from the heat and leave it to steam for a further 10 minutes. Fluff it up with a fork and remove the cinnamon sticks before serving.
For the sauce
1 tsp of oil
1 medium onion, peeled and chopped
1 clove of garlic, peeled and chopped
1 Tbsp of water
1 Tbsp of tikka masala spice
115g of tomato paste (I used the new kind in a plastic container, the cans come in 70g, so use 2 or just dilute it with some water as they are pretty intense)
200ml of lite coconut milk
1 Tbsp of cashew nut paste (or peanut butter) optional
2 tsp of sugar
1 tsp of salt
Add the oil, onion and garlic in a pan on medium heat and lightly fry for a few minutes. Add the tikka spice and water and fry further. If it gets too dry add a little more water but you want to fry this until the onions have softened and released their natural sugars.
Add the remaining ingredients and simmer until all the flavours have combined. Add the cooked chicken and serve with fresh coriander and the spicy rice.
I doubled the recipe and froze individual portions (with rice) which I defrosted during the week for lunches, they were perfect!


