
Lifestyle
Domestic Goddesses provides a holistic life style management service. We strive to assist you in creating a harmonious well balanced life though healthy eating habits, movements, home management, home décor and refurbishments.
We will consult with you about all your personal health and home needs and set out a program to relieve the stress of the admin responsibilities of creating a home environment that gives you respite from the stresses of living a highly functioning life.

Quick crunchie dessert
Last night I whipped up a quick dessert for friends by taking a scoop of vanilla ice cream, crumbling a crunchie on top and topping it off with a tiny bit of finely chopped fruit (I used a plum, grapes and an apple ie. what was in my fruit basket and sealed it with a squeeze of lemon to stop it from browning) It looked good served in martini glasses and went down pretty well for a last minute dessert.
Crunchies
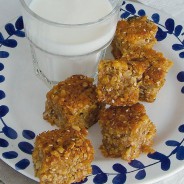

Cape Grace has for many years served the yummiest crunchies around. I have used that recipe as a foundation and tried to make it easier, upped the fibre and dropped the butter and sugar. I think my version is pretty damned delicious… try them and let me know?
Crunchies
Makes about 30 crunchies
2 cups (200g) of desiccated coconut
½ cup toasted seed mix (omega mix or miracle mix or ultimate mix)
2 cups (250g) of jungle oats
2 cups rice crispies
2 cups brown or nutty wheat flour
½ cup treacle sugar
½ tsp of Salt
Mix the above in a large mixing bowl
300g melted butter
1 cup of honey or golden syrup
2 tsp bicarbonate of soda
Melt and whisk together the above 3 ingredients until it starts foaming, then add to the dry ingredients and mix well.
Press the mixture lightly into a greased baking tray – try to use quite a deep baking tray and get the mixture about 2 – 3cm thick. Bake in a pre-heated oven 170C for 15 – 20mins or until golden brown in colour.
Allow to cool before turning out and cutting into squares. Store in an air tight container.
PS – if you want this recipe in a nice printable word format, please e-mail me at info@domesticgoddesses.co.za and I will gladly mail it to you.
Fillet Balsamico
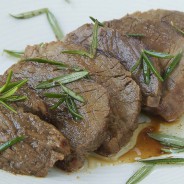
 A dear Italian friend of mine and awesome cook taught me how to do this super simple and simply delicious, melt in your mouth fillet.
You marinate your fillet in an abundance of good olive oil, balsamic vinegar and bruised rosemary leaves. I use about half half oil to vinegar ration and an ample amount of rosemary leaves striped from the stalk and bruised by rubbing and crushing them in your hands. Nothing else, especially no salt. Place the fillet in a snug container so the marinade can cover it and turn it every so often if you remember. I like to leave it for about 2 hours or so.
When you are ready to cook the meat remove the fillet from the marinade place it on a baking tray and into a preheated oven, reserving the marinade. I like to have my oven on top heat so I can get the fillet crispy and crusty on the outside while still rare on the inside, but that is up to you. You should however keep the meat rare as it will cook further after removing it from the oven.
Grill the meat for about 15 to 20 minutes depending on the size of the fillet. Remove it from the oven and slice it into slices of about 1 – 2cm thickness. Arrange the slices onto a serving platter and pour the reserved marinade generously over the hot meat and place back into the oven for 5 minutes. You can then grind some salt and pepper over the top and serve immediately. The vinegar continues cooking the meat and gives a tenderness and flavour that is truly memorable.
Summer serving suggestion: crispy Mediterranean potatoes and rocket salad
Winter serving suggestion: Dijon mustard mashed potatoes and roasted root vegetables
PS – if you want this recipe in a nice printable word format, please e-mail me at info@domesticgoddesses.co.za and I will gladly mail it to you.
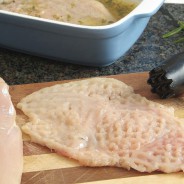
Tenderised chicken breasts

Veggie Mac n’ Cheese
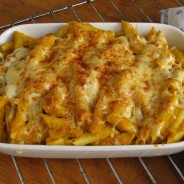

Adam was telling me about a pasta dish his granny used to make for them as kids. It sounded like a good way to get kids to eat their veggies and a comfort food meal for adults as well. I have naturally tweaked it to make it my own. And I have kept it as simple as possible so that it’s easy to make and have kept the flavors as neutral as possible so that even the fussiest kids would eat it.
Serves 4 – 6
A selection of neutral or yellow/orange-coloured veggies. I used:
2 cups butternut, cubed
1 ½ cups carrots, peeled and cut into coins
½ a large onion, chopped
1 clove of garlic, chopped
1 cup cabbage, shredded
250g uncooked macaroni (I used penne rigate), cooked and drained
2 Tbsp butter (optional)
¼ tsp of mild curry powder (trust me!)
Salt to taste
2 cups of grated melting cheese (I used a white cheddar)
Method
Step 1
Get your pasta cooking and lightly steam the veggies. It is so important not to overcook the vegetables as this is when they get that sulphurous flavour which put most kids off them. If you have a steamer, use as directed. I simply put about 2cms of water in a pot the right size for the amount for veggies and got that boiling. I added the chopped butternut as that was the hardest veg I was using. The smaller the cubes the faster they will cook. I then added the carrots about five minutes after the butternut (that’s how long it took me to wash, peel and cut them). I let that steam for about five minutes before I added the roughly chopped onion and garlic. Steaming onion and garlic removes their strong flavour and brings out their natural sweetness. I steamed that for a further five minutes.
Step 2
Use a sharp knife to check if the veggies are cooked through. They must not be mushy. I added the chopped cabbage and then switched the heat of the pot off and left it for a further five minutes. Check if the cabbage is tender, if not, leave to steam further in the pot with no extra heat.
Step 3
Drain the rest of your pasta until you are ready to use it. Puree the veggies with the butter, curry powder and salt. I find a stick blender the easiest to use as you don’t have all the extra bits to wash up. Grate the cheese and combine half with the pureed veggies and mix in the pasta. You can serve this directly onto plates and top with the remaining cheese or place this into a casserole dish and top with the remaining cheese. Bake under the grill just before serving until the pasta has heated through and the cheese is bubbly and brown on the top.
Tips
1. I have purposely left the flavouring very mild for this dish to make it suitable for small children. If your family likes spicy flavours, add more curry powder and lots of black pepper. You can also add bacon bits or chicken to add a lovely meaty flavour.
2. Appropriate veggies to use other than those I used: cauliflower, baby marrows, mushrooms (these would need to be lightly fried in a pan – not steamed), gem squash, sweet corn, patty pan squashes, turnips, sweat potato. If your kids aren’t too averse to greens you can add spinach and broccoli. I would avoid tomatoes as they are too acid and would mess with the mild creamy flavour. I would avoid peppers (even the yellow and orange ones) as when they are cooked they have a very strong flavour but that it a personal opinion.
PS – if you want this recipe in a nice printable word format, please e-mail me at info@domesticgoddesses.co.za and I will gladly mail it to you.
Healthy Rusks Recipe – Low sugar & high fiber
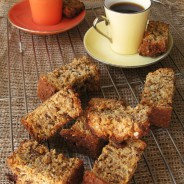
Are rusks healthy? I love rusks and the answer is, unfortunately, no, something I realized after making them a few times and learning how much sugar and fat go into them. With that, I started to feel more and more guilty about eating them. I have experimented with many so-called healthy rusks recipes and in my experience, if you drop the fat content too much the rusks end up super hard. Make low sugar rusks and they can taste a little bland.
But I have successfully reduced the sugar in this rusks recipe by 80% and added lots of fiber-rich ingredients making it tummy friendly. Best of all there is no compromise in flavor – the whole family will love this homemade rusks recipe!
Healthy rusks recipe

2 cups cake flour
2 cups nutty wheat or brown flour
2 cups bran flakes
2 cups desiccated coconut
1 cup oats
½ cup of toasted seeds (breakfast mix; omega mix; ultimate mix)
15 ml bicarbonate of soda
15 ml baking powder
15 ml cream of tartar
150g brown sugar
2tsp cinnamon
10ml vanilla essence
100g honey
Nonnutritive sweetener (the equivalent of 20 spoons of sugar)
5ml salt
400g butter, just melted
2 large eggs, beaten
800ml buttermilk
Preheat the oven to 200˚C.
To make this healthy rusks recipe sift together all the flour and add the remaining dry ingredients.
Make a well in the center and pour in the melted butter, honey, buttermilk, and eggs.
Mix to form a thick dough.
Spread into a greased baking tin and bake until risen and golden brown, about 45 mins to an hour. Allow to cool completely before cutting the low sugar rusks into long thin pieces. You can speed up the cooling process by putting the tray in the fridge or freezer.
Arrange the rusks spaced out on a baking tray or wire rack and dry them in the oven at 80˚C for a couple of hours until crisp and dry.
Pin for later!


Quick, Easy and Healthy Chicken Curry


I can make this curry in the time it takes me to steam the rice I serve with it! It is full of flavour but still light enough to enjoy a gulit free second helping.
Chicken Curry
Serves 4
80mls of olive oil
3 medium onions
75grams of ground almonds
400grms plain yoghurt or can of coconut cream (if going for a non diary option)
6 Medium chicken breasts or one pack of Fry’s vegetarian chicken style strips
3 tsps (15mls) cumin
2 tsps (10mls) coriander
2 tsps (10mls) garam marsala
2 tsp (5mls) turmeric
1/2 tsp (2.5ml) chilli powder (or to taste)
1/2 tsp (2.5ml) black pepper (or to taste)
1 1/2 tsp (7.5ml) salt (or to taste)
Chopped fresh coriander to serve
Chop up and fry the onions in half the olive oil until golden brown. Combine with the ground almonds and yoghurt and blend until smooth. It will still be slightly grainy in texture, not 100% smooth. Set aside.
Cut the chicken up into small cubes. Gently fry the spices in the remaining oil until flavours are released (1 or 2 minutes) and then add the chicken, frying until just cooked. Do not over cook the chicken.
Add the yoghurt sauce to the chicken along with the salt and stir gently until all the flavours have combined and curry has just begun to gently simmer. Remove from heat and allow flavours to develop. Heat through just before serving.
This dish is ideally served with sambals and topped with fresh chopped coriander. Basmati rice, Jasmine rice, rotti’s or naan are the ideal starches to serve with it.
If cooking for dinner party this dish is perfect to prepare the day before as flavours only improve over night.
For those of you who would prefer a lower fat option, use fat free yoghurt and cut down the almonds and the oil a bit. It won’t be as creamy but will still be very yummy.
For those of you who don’t care – double cream Greek yoghurt is awesome!
Christmas Mince Pies
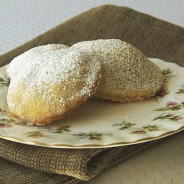

I created this recipe as I am usually not a big mince pie fan, feeling that the pastry is too floury and there’s too much of it. The fruit mince is often too intense in flavour. Both the recipes for the dough and the fruit mince have been adjusted to create a much lighter more subtle but still hugely flavoursome combination. It really is a winner.
It is great to make with kids as there is some easy grating and mixing and the fiddly making of the pies is suitable for slightly older kids. The pastry can be pretty tricky to work with but kids certainly can help with cutting out the rounds.
for the dough:
2 ½ cups of flour
2 pinchs of salt
100g ground almonds
1 tsp vanilla essence
2 egg yolk
½ cup castor sugar
Rind of half a lemon
Squeeze of lemon juice
200g butter
2 – 3 Tbsp ice water
Sift your flour into a mixing bowl. Add the salt, ground almonds, vanilla essence, egg yolks, sugar, lemon rind, squeeze of lemon juice and cold butter cut into cubes. Combine the ingredients by rubbing it between your fingers until well mixed and has formed rough crumbs. Add the iced water to the crumbs to form a dough like mixture. Roll this into two balls and refrigerate for an hour or two until the dough is cold.
For the filling:
½ a jar (200g) of Christmas fruit mince
½ a cup of grated apple
½ tsp cinnamon
½ tsp vanilla essence
½ tsp rum/brandy essence
50g of finely chopped nuts, I usually use pecan nuts but almonds, macadamia, hazel nuts etc will also be good.
Combine all the ingredients and refrigerate until ready to use.
Pre heat your oven to 160°C. Place your rack in the centre of the oven.
Find an appropriate surface for rolling out your dough. Make sure it is clean and dry. Liberally flour the surface, a rolling pin (if you don’t have one a wine bottle works well) and your hands. Using the first dough ball, start flattening it by gently squashing it down with your hand. Where it begins to crap, squeeze these cracks together. Keep flipping the dough and re-flouring it on both sides. Gently flatten the dough with rolling pin. Keep re-flouring so that the dough does not stick to the rolling pin or to the surface. Get the dough to about 2 – 3 mm thick before cutting out rounds. If you have cookie cutters, chose medium sized one. If you don’t, a tea cup or mug with a think edge also work. Use a spatula to loosen and lift your rounds. If you have rounds of varying thickness, use the thinnest ones as bases and the thicker ones as tops. Roll the scrap dough into a ball and put it back into the fridge.
To assemble the pies get a cup or bowl of water ready, place a disc on a baking tray and with your finger tips lightly wet the edges of the disc. Using a teaspoon scoop out a small amount of fruit mince into the centre of the pie. Flatten this with your finger tips, taking care to keep the filling well away from the edges of the dough. Take a second disc of dough and cover the filling gently pressing along the edges to seal the pie. Continue this process until all your discs have been used. Place the baking tray into the oven and bake the pies for 15 – 20 minutes. While the first set is baking repeat the process with the second ball of dough and again until all your dough has been used.
Allow the mince pies to cool and dust with sifted icing sugar.
Christstollen

 |
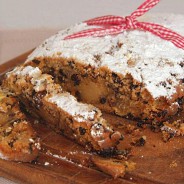
| This is the recipe my Mom copied for us from step Granny – as you can see it’s been well used! |
Cup Cakes for Cuma
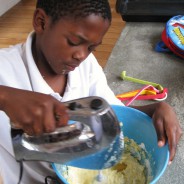


Recently it was the birthday of my nephew’s best friend, Cuma. I decided that some cup cake baking was in order. I used a Vanilla Sponge recipe I found at my Mom’s house the other day in this divine Italian cook book. I’m not really a sponge cake gal myself but this one is dense, moist and super quick and easy. I served it for guests the other night (as a cake) filled with macerated berries and soft whipped cream… mmm…
Vanilla Sponge Cake
250g Butter, just melted but not oily, plus extra to grease the pan
250g (1 ¼ cups) castor sugar
4 large eggs, beaten
1tsp vanilla extract
225g (1 ½ cups) cake flour
25g (2 Tbsp) corn flour
2 tsp baking powder
Squeeze of lemon juice
Heat the oven to 180 degrees. Butter a 25cm shallow round cake tin. Whisk the melted butter and sugar until light and fluffy, slowly beat in the eggs, vanilla and lemon. Gradually sift in the flour, corn flour and baking powder. Pour into the tin and bake until golden and springy for about 20 – 25 minutes.
This mixture is also ideal for cup cakes. I makes about 20 cup cakes and needs to bake for 10 – 15 minute.
Remove from tin when cooled. You can serve this plain, dusted with icing sugar. I like to fill this cake with sugared mashed up berries, soft whipped cream and dusted with icing sugar.
Let the kids have fun with different coloured butter icings and decorations if using this recipe for cup cakes.


