Lifestyle
Domestic Goddesses provides a holistic life style management service. We strive to assist you in creating a harmonious well balanced life though healthy eating habits, movements, home management, home décor and refurbishments.
We will consult with you about all your personal health and home needs and set out a program to relieve the stress of the admin responsibilities of creating a home environment that gives you respite from the stresses of living a highly functioning life.

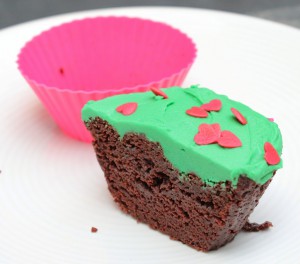
Mini cup cakes for a truly inspired Domestic Goddess!

Cup cakes have never been my thing. Well, cake in general is not really my thing, but cup cakes especially are sooooo time consuming to make, and gone in seconds. Last year a very dear family friend passed away and she just LOVED cup cakes. She was a larger than life character, bold and dynamic. When my aunt called to ask me if I would make some cup cakes for the wake I headed straight to The Baking Tin and bought the brightest food colourings, edible glitters and toppings I could find.
There are some family members who are gluten intolerant so I decided to do one normal and one gluten free cup cake. The gluten free cup cake was easy as I had that in the cupboard already, a Bob’s Red Mills gluten free brownie mix. I just whipped it up and piped into the mini cup cake papers.
The other cup cake I improvised on. I used my vanilla cake recipe and added ground hazelnuts to it. Once they were baked I cut little cones out the top of each cake and piped in some salted caramel. The brownies were moist enough and didn’t need filling.
I made a batch of butter cream icing, divided it up into bowls and whacked loads of food colouring into each one. Then the fun began with glitter and sprinkles and balls and hearts and flowers!
I think Lee would have liked them.
|
|
I am not a huge advocator of instant cake mixes but this mix was very worth while. While being gluten free it doesn’t compromise on flavour or texture. It is super moist and chewy with a rich deep chocolaty taste. |
Eat Out best local blogger awards!

It is with great pride that I get to share with you all, that my little blog has been nominated into a list of SA’s best local food blogs, by the peeps at Eat Out. The other blogs I am sharing this honor with are pretty darned awesome, so I am truly flattered.
It is a people’s choice award so the public gets to vote who actually wins the award. So if you would like to cast your vote for me. Click through the icon below, scroll down to the bottom of the blogger list and follow the prompts.

So what’s all the fuss about?
For the last few years I keep seeing red velvet cakes all over, in bakeries, blogs and magazines. Looking at the recipe it doesn’t sound like a particularly earth shattering arrangement of ingredients. In fact, aside from the cool red colour contrasted with white icing, I couldn’t see what all the fuss was about.
Then a client asked me to make her one for a special luncheon. I set about finding the best possible recipe and I think it turned out pretty well. It seemed to me that the secret to this cake, aside from the cool colour, was all in the icing. The cake itself is relatively neutral in taste but needs to be light and silky in texture.
The best icing recipe I could find is a variation on a simple cream cheese icing. But it really does take it to a new level. Pure sin – but I feel if you’re going to eat cake you may as well make it worth it.
So here goes!

Red Velvet Cake
Serves 8 generous slices and up to 12 modest ones
250g cake flour, sifted three times
½ tsp of salt
30g of cocoa powder, sifted
1 cup (250 ml) of buttermilk
2 Tbsp of vegetable oil
2 Tbsp of liquid red food colouring (get a bright vivid red food colour)
1 tsp pure vanilla extract
100g of butter, out the fridge for about 30 mins (cool but not soft)
250g of castor sugar
2 large eggs
1 tsp of white wine vinegar
1 tsp of bicarbonate of soda
Cream Cheese Icing
250ml of cold heavy whipping cream (double cream)
250g cream cheese, room temperature
250g tub of Mascarpone cheese, room temperature
1 tsp pure vanilla extract
200g of icing sugar, sifted
Pre-heat your oven to 175˚C and place the rack in the center of the oven. Butter a 23 – 25 cm round cake tin and line the bottom with wax paper. Set aside for later.
In a mixing bowl sift together the flour, salt and cocoa powder. In a measuring cup whisk the buttermilk, oil, red food coloring and vanilla and set aside.
In the bowl of your electric mixer or with a hand mixer, beat the butter until soft (about 1-2 minutes). Add the sugar and beat until light and fluffy (about 2-3 minutes). Add the eggs, one at a time, beating well after each addition. Scrape down the sides of the bowl while mixing.
With the mixer on low speed, alternately add the flour mixture and buttermilk mixture to the butter mixture. Add half the flour, then all the buttermilk, then the last of the flour combining in between.
In a small cup combine the vinegar and bicarb. Allow the mixture to fizz and then quickly fold into the cake batter. Pour the batter into the cake tin and smooth the top with a spatula or the back of a spoon pushing it slightly up at the sides of the tin. Bake in the pre-heated oven for approximately 30 – 35 minutes, or until a knife inserted in the center of the cake comes out clean.
Cool the cake in its tin on a wire rack for 10 minutes. Place a wire rack on top of the cake pan and invert, lifting off the pan. Remove the wax paper.
Once the cake has completely cooled, wrap in plastic and place the cake in the fridge for at least an hour or overnight.
To make the cream cheese icing, whip the cream until stiff. In a separate bowl whip together the cream cheese, mascarpone cheese, vanilla and icing sugar. Once well combined fold the whipped cream into the cream cheese mixture. Refrigerate until ready for use.
When you are ready to assemble the cake, cut the cake in half, horizontally. I like to use the underside of the cake as my top surface as it has a flat and even top. You can trim the rounded part of the cake off to make a flatter bottom.
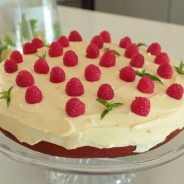
Spread the bottom cake layer with a thick layer of icing. Cover with the top layer and continue to ice the whole cake, top and sides. Decorate the cake as you wish. I think raspberries and mint leaves finish it off beautifully.
Danish Hazelnut and Apple Cake
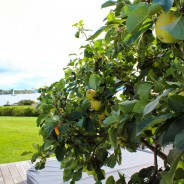
This post has been a long time coming. These pictures were taken in July 2012 in Norway and I have just simply not gotten round to posting about this fabulous recipe. I have in fact taught it to two different families in SA already and made it for the Spier Secret Supper but just haven’t blogged about it yet.
I stumbled across the pictures just now and got swept away in the heart stopping beauty of Norway again. What a magical place. And this recipe, even though it is Danish in origin is a rich and textured reminder of the flavours of Scandinavia.


Apple cakes are hardly uncommon in South Africa, but this recipe is so totally different. Making the batter with ground hazelnuts changes the flavour in a way which just takes this simple cake to a whole new level.

Danish hazelnut and apple cake
Makes one large cake
For the filling
700g of apples; peeled, cored and cut into slices
100ml of apple juice
50ml of apple cider vinegar
1 Tbsp of vanilla essence
1 Tbsp of honey
For the cake batter
400g of hazelnuts
200g butter, at room temperature
375g of treacle sugar
2 large eggs
2 large egg whites
100g of cake flour
¼ tsp of salt
Combine all the filling ingredients in a mixing bowl and allow them to stand until ready for use. Toss occasionally so that apples marinade well in the added flavourings.
Pre-heat your oven to 170˚C and place the rack in the middle of the oven.
Pulse the hazelnuts in the blender until they form a rough powder, not too fine. In a large mixing bowl add the hazelnuts, butter and sugar. Using a cake mixer, combine well. Add the eggs one at a time, blending until well combined before adding the next egg. Sift in the flour and salt and combine.
Pour the batter into a well greased and lined spring form cake tin (about 25cm in diameter). You could also use a quiche tin or pie dish (but then you should not line the tin). Arrange the apples over the batter and press the apples lightly so that they start to sink into the batter. Reserve any of the juices from the apples for later.
Bake the cake for about 60 minutes. If the cake starts to brown on the top too much, cover it with foil. The cake should be golden brown on top. As soon as the cake is ready, remove it from the oven and place it on a cooler rack. Drizzle with the remaining juice from the apples. Allow to cool before removing the cake from the spring form or quiche tin. If using a pie dish, you can serve the cake in the pie dish.
Serve with vanilla ice cream or softly whipped cream.
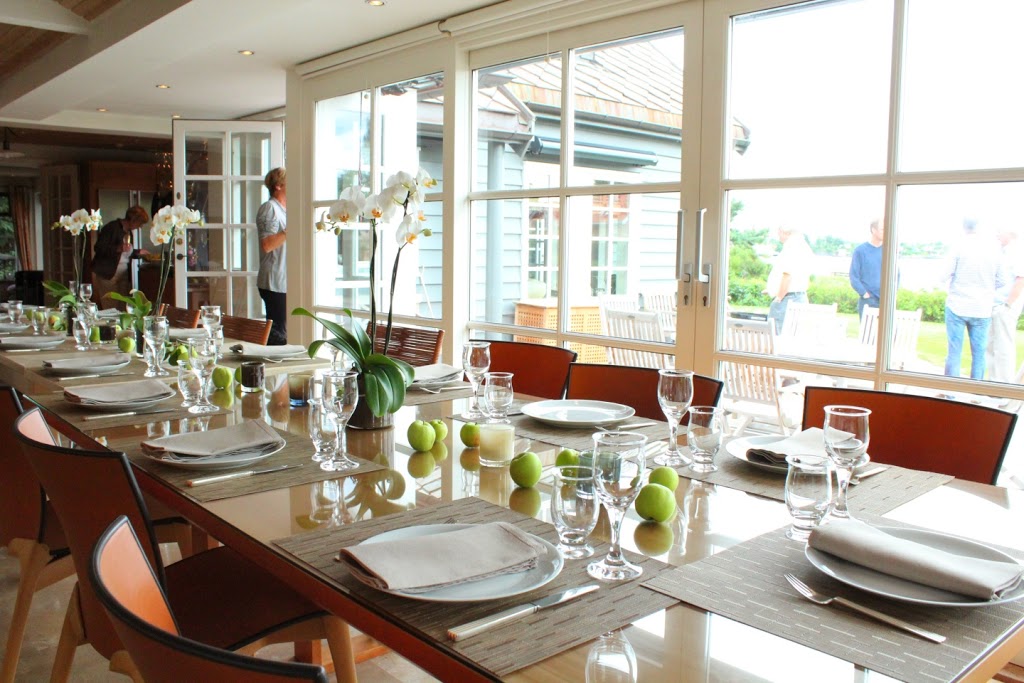
There were so many apples on the tree we decorated the table with them too.

My favorite soup of all time

When it is searing hot, like it is in Cape Town at the moment, soup is the last thing anyone feels like. For me however there are two exceptions; gazpacho naturally but also Tom Kha Gai which is my absolute favourite Thai soup of all time.
It is a chicken and mushroom soup with a coconut milk broth base, flavoured with lime juice and lemongrass. I add a few extra veggies, which are not part of the traditional recipe, to add crunch and colour.
This soup is so refreshing with its spicy zesty flavour that, in my opinion, it is a perfect summer starter soup, or even as a main course for a two course meal.

Tom Kha Gai
Serves 4 – 6
1 x 400ml tin of coconut milk or cream
750ml of chicken stock
1 Tbsp of fresh ginger, grated
1 stalk of fresh lemongrass, split lengthways and bashed
3 fresh lime leaves (6 dried lime leaves)
1 – 2 Tbsp fresh lime juice (lemon juice can be substituted with caution)
1 – 2 Tbsp of fish sauce
1 tsp sugar (or to taste)
1 tsp chilli paste or 1 Tbsp of fresh chopped chilli (seeds removed)
500g chicken breast (skin and bone free), thinly sliced widthways
125g of thinly sliced mushrooms
½ a yellow or orange pepper, thinly sliced
100g of cherry tomatoes, quartered
2 spring onions, thinly sliced
Small bunch of fresh basil leaves, roughly chopped
Small bunch of fresh coriander leaves, picked
In a medium pot over high heat, combine the coconut milk, stock, ginger, lemongrass, lime leaves, lime juice, fish sauce, sugar and chilli; bring to a simmer. Allow this to simmer for 5 – 10 minutes while you chop the chicken and veggies. Taste and adjust the seasoning. Strain the soup through a sieve.
Add the chicken and mushrooms and simmer until the chicken is just cooked. Add the peppers and tomato and stir to heat through. Serve immediately into bowls. Garnish with the spring onion and coriander.
A new Goddess joins the team!
At the end of last year Natalie joined Domestic Goddesses on a freelance basis. She has subsequently fitted into the team so well and our clients who have worked with her, loved her just as much as we do. So she’s joining us full time!
Apart from being a naturally gifted cook, Natalie has been working on the super yachts of the rich and famous for over 9 years. She worked her way up to the position of Chief Stewardess, which is about as high as it goes for interior staff.
On her last yacht she led a team of 8 stewardesses ensuring that cleanliness and service was of the highest possible level. When you are paying 6 million rand a week to rent one of these yachts, guest expectations are pretty high.
If you are curious to see the last yacht Natalie worked on, click here.
She has extensive experience training ladies in all areas of housekeeping; including laundry with a special focus on textile care and stain treatment; general and specialised cleaning, time management and cleaning schedules as well as table setting and service.
Apart from assisting me with cookery training, Natalie will be handling all our housekeeping training. I have also asked her if, from time to time, she would share some of her recipes and housekeeping tips on the blog too.
Welcome Natalie – we are so happy to have you with us.

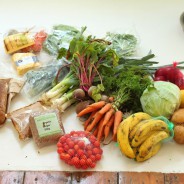
Crazy for organic
Ever since returning from Norway, I have gone organic crazy. The family I worked for there tried, as far as possible, only to eat organic or bio-dynamic products and we had many discussions around the topic. I feel particularly strongly about it as I drink freshly pressed fruit and veggie juice daily and the idea of the pesticides going in concentrated form through my juice into me, has become totally unpalatable.
So in my quest for organic products I have found that the larger Woolies stores such as the one in Cavendish Square; Wild organics and the Ethical Co-op have provided me with a huge selection of relatively reasonably priced products which have so far not been that hard to get hold of. It’s still a far cry from popping into my local store and being able to get all I need there. But then again, there is a certain special charm and enjoyment to getting a weekly hamper stuffed to the brim with good, wholesome and exciting food. And also making a special trip to a store or market to find things which are made with care and love. You end up treating those things with the same care and love they were produced with.
I am so over the mass produced convenience which is rammed down our throats at every turn. And then having to run to the gym or the doctor to solve the problems related to our excessive life styles.
Okay, okay – I will get off my levitating soap box now. I have sooo many guilty pleasures I can’t even keep count, but 2013 is my year to try to live and eat more consciously.
 |
| Yesterdays box of pure joy from Ethical co-op! |
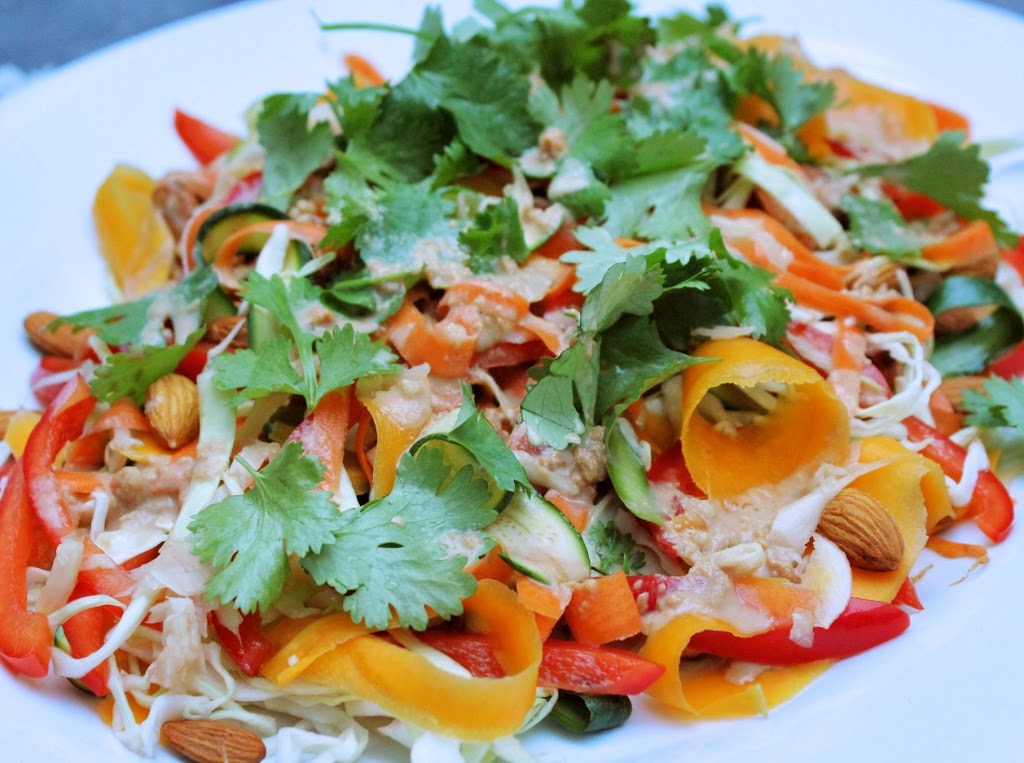
Flavor burst Pad Thai salad

One of my most unexpectedly successful recipes from last year was my Pad Thai salad. I first discovered the inspiration for this recipe in a Fresh Living magazine and added it to a list of recipes I taught the domestic of a client of mine, who is a raw vegan.
It has become a household favourite of mine and I have been making and remaking it non stop with various tweaks and twists each time. My clients have also been loving it and I have taught this recipe at least half a dozen times for various clients since I came back from abroad. Every time it has been a smash hit.
When you look at the ingredients, most people are suspicious and can’t imagine this being any good. But once you taste it, it is a burst of freshness and flavour. Totally unexpected.
Pad thai salad
Serves 4 side salads or 2 main courses
1 cup of butternut, peeled into ribbons with a potato peeler
1 cup of cabbage (red or green), finely shredded
4 baby marrows, peeled into ribbons with a potato peeler
2 medium carrots, peeled into ribbons with a potato peeler
½ a red pepper, cut into thin strips
1 tsp of salt
½ a cup of raw cashew nuts (peanuts or almonds)
2 Tbsp of pickled ginger, roughly chopped
Dressing
80ml of coconut cream (or coconut milk)
2 Tbsp of peanut butter (or nut butter of choice)
1 clove of garlic, crushed
1 tsp of fresh ginger, finely minced
2 Tbsp of soya sauce
1 Tbsp of the juice from the pickled ginger
Juice of 1 lime or half a lemon
a handful of coriander leaves, picked and washed for serving
1 fresh chilli, chopped (optional)
Toss the veggies with the salt and set aside while making the sauce. Whisk together all the ingredients for the sauce until smooth.
Arrange the veggies on a platter and drizzle with the dressing. Or toss them all together in a large bowl and serve into individual portions.
Garnish liberally with the nuts, pickled ginger and coriander. Add chopped chill to the garnish for extra zing if you like that.
I’m alive!
No, I have not died. No, I have not given up blogging. No, I have not run away to join the circus. But yes, I have been on holiday!!!
Last year was quite a formidable year for me. The last few weeks of the year also culminated in complete work mayhem. So when the time came to catch my breath and take a few weeks of much needed rest, I quite literally stopped. I did the barest amount of cooking possible and relied on those who don’t cook for a living to have a turn in the kitchen. I didn’t write or take photographs. In fact I barely opened my laptop.
I did sleep a lot, nap a lot, watch a lot of movies, read a bit, walk a bit, sun bathe a bit, swim a bit. All of this I did very slowly; very very slowly. There were, of course, many fun gatherings around my birthday, Christmas and New Years as well as friends and family visiting. My husband and I also celebrated our first wedding anniversary. So it was a time of celebration, fun, frivolity and above all rest!
As far as blog worthy topics go, I have allowed most of this holiday to fade away into a lovely satisfied blur, but the two things I am going to have to talk about are my new coffee machine and my induction hob! But not today…
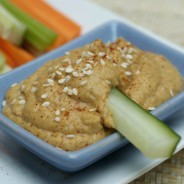
Today, I am going to remind you about that fabulous multipurpose paste of pure pleasure – hummus! I just made a fresh batch today and have been teaching it and making it for events non-stop over the last year. Kids love it, grown ups love it. It’s great as a dipper, it’s great as a spread. No fridge should be without it.

Hummus
Makes about two and a half cups
2 cups of soaked and cooked (or canned) chickpeas
2 tsp of ground cumin (or to taste)
1 tsp of paprika (optional)
¼ tsp cayenne pepper (optional)
2 cloves of garlic, peeled
2 tsp of lemon zest
3 – 4 Tbsp of lemon juice
2 – 3 Tbsp of tahini
1 tsp of salt
½ a cup of olive oil
½ a cup of iced water (more if needed)
Blend all the ingredients together until smooth. Add as much water as needed to achieve the desired consistency and blend long enough to get the mixture silky smooth.
Hummus freezes well, so you can make extra and defrost it when needed.
Mrs. Moxon’s Posset
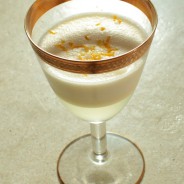
This dessert is a family tradition. My mother has made it for as long as I can remember and it has always been called Mrs. Moxon’s posset. Who this Mrs. Moxon is, non of us know. But her name lives on and try as I may, I can’t bring myself to call it anything else.
It is in essence a kind of syllabub – traditional wine and cream mixture. But there is nothing old fashioned about the light and refreshing taste; the look is elegant and unique; and it is in my opinion the perfect way to end off a summer meal.
Mrs. Moxon’s Posset
Serves 4
250ml of white wine (I used an organic sauvignon blanc)
½ a cup of castor sugar (or to taste)
2 Tbsp of lemon juice
½ a cup (125ml) of whipping cream
1 Tbsp of lemon zest
Combine the wine, sugar and lemon juice and stir until the sugar has dissolved. Whip the cream until stiff being careful not to over whip as the cream will split. Stir half the lemon zest into the cream. Fold the cream and the wine mixtures together until just combined.
Divide the mixture up equally between four pretty glasses. Use the remaining lemon zest to garnish the top of each dessert. Carefully transfer the dessert to the fridge and leave for a few hours to separate and set.
The cream should rise to the top of the glass leaving a lemony wine mixture at the bottom of the glass. Serve chilled with teaspoons to eat it with.


