Lifestyle
Domestic Goddesses provides a holistic life style management service. We strive to assist you in creating a harmonious well balanced life though healthy eating habits, movements, home management, home décor and refurbishments.
We will consult with you about all your personal health and home needs and set out a program to relieve the stress of the admin responsibilities of creating a home environment that gives you respite from the stresses of living a highly functioning life.

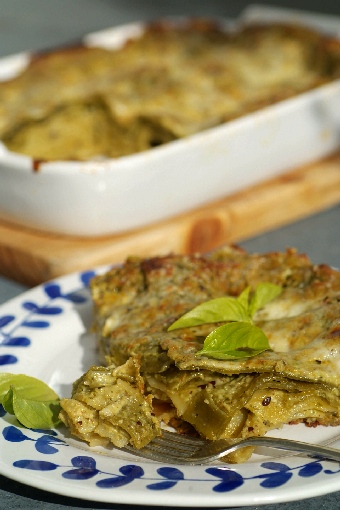
Lasagne al pesto!
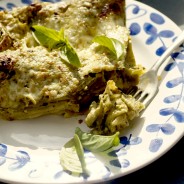
I have five good reasons for making lasagne al pesto on a Monday morning. It was Monday and Mondays suck so one needs comfort food to ease the pain. My basil bushes are still in over drive in June and I had to celebrate this fact by making a massive batch of pesto. Last week I made lasagne but it was for someone else so I never got to eat any. My very dear Italian friend made me a lasagne al pesto once and I have always been meaning to recreate this ultra simple and ultra delicious dish. I watched Garfield with my nephew this weekend. Justification complete!
I whipped up some pesto (my own unconventional brand) but you can use a traditional recipe or go buy the best pre-made pesto from Pesto Princess. Then I made about 750ml of white sauce, added a cup of pesto to this and started layering my lasagne. Into the oven and done. I had it for lunch and supper yesterday and am happier for it!
I do have some modifications I will suggest if you decide to make this yourself. If using dry lasagne sheets, be generous with your sauce in between layers (I was a little too meagre) and make the sauce thinner than you would usually make a white sauce. The pasta will adsorb a lot of the moisture and you want the end result still to be moist and saucy.
I did some reading about this lasagne this morning and saw a suggestion which I though could be a great lasagne for me to try next. Alternate layers of pesto sauce with a pomodoro sauce or a red pesto sauce. I think that combination would be killer!
Lasagne al pesto
Serves 4
1 cup (250ml) of Basil Pesto*
3 cups (750ml) of thin white sauce*
250g of dry lasagne sheets
1 cup of grated cheese, Parmesan or any good melting cheese will work well.
Pre heat your oven to 180C˚ and place the rack in the middle. Combine the white sauce and the pesto.
Assemble your lasagne in a small square or rectangular casserole dish (about 2 litres in volume). Start with a generous layer of sauce then pasta (break the sheets it as needed to make a full covering to fit the dish), top this with a generous layer of sauce. Continue this process until the sauce runs out. The sauce needs to be the final layer and it needs to be a thick final layer. Leave at least 1 cm space from the top of the dish to allow the lasagne to expand. Cover the dish with foil and bake for 45 minutes or until a sharp knife can easy pierce through the layers of pasta.
Scatter the grated cheese over the lasagne and grill until the cheese is golden and bubbling.
* Thin White Sauce
Makes about 3 cups
5 Tbsp of white flour
4 Tbsp of oil
750ml of milk
2 tsp of a smooth mustard
1 cup of a grated strong tasting white cheese (optional)
1 tsp of salt
Heat the oil and flour in a medium sized pan or pot. Allow it to fry for a few minutes while stirring the paste with a whisk. Remove it from the heat and add half the milk. Stir this with your whisk until the paste and milk have combined, then add the rest of the milk. Return this to the heat and stir it with your whisk slowly while waiting for the sauce to thicken. If it starts thickening very fast, remove it from the heat and continue stirring it until the thickening has settled down. It will reach a point where the thickness stabilises. Turn down the heat to low, add the mustard, cheese (if using) and salt and allow to combine.
*Basil Pesto
50g of pine nuts (macadamia nuts are a great cost effective alternative)
1 clove of garlic
125ml of olive oil (for a lower fat alternative use half oil, half water)
50g of parmesan cheese (or similar – pecorino, grana padana)
40g of fresh sweet basil leaves
Salt to taste
Blend the nuts, garlic, olive oil and cheese together to form a paste. Add the basil and blend until just fine, but don’t over blend, add salt to taste.
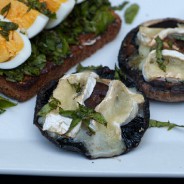
Grilled black mushrooms topped with Camembert.
The fact that I am a mushroom fiend is no secret so writing about them a lot is going to be part and parcel of this blog as I eat them as often as I can. I had them for breakfast and for dinner yesterday and could have them for lunch today again if I had any in the fridge!
The grilled black mushrooms we had for breakfast yesterday are a stalwart in my cooking repertoire, I do them as an hors d’oeuvre, a side dish, main course, I do them as a breakfast dish… they are that versatile and that good. As an hors d’oerve I would choose smaller black or brown mushrooms and work my way up size wise. If I find those massive black mushrooms they would most certainly be a main course served as one would a steak and are definitely as tasty!
The way I did them yesterday was set the oven on grill, laid the mushrooms stems up on a baking tray, I sliced garlic into thin slices and laid them in a circle around the stem, topped that with thin slices of butter and a little herb salt. Once the mushrooms had grilled for about 10 minutes, starting to shrivel at the edges and brown a little, I laid two slices of Camembert on each mushroom and grilled that until there were just melted and starting to bubble. The Camembert is not essential except that it is frickin delicious and adds a creamy salty stickiness which I would prefer not to do without.
I do however have another way of doing them and that is to dollop a heaped teaspoon of good basil pesto on to each mushroom and grill it before topping it with camembert which is also a fabulous way of the doing them!
Last week I did them with my roasted beetroot dish and creamy mashed potato and it was to die for!

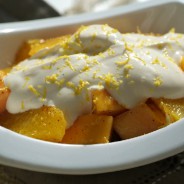
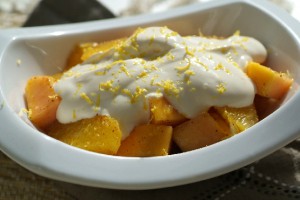
Spiced winter fruit with vanilla and lemon zest creamed cheese
100 apologies for the lack of blog yesterday… this is officially my 100th blog post and I had planned to post it yesterday but I had a chaotic super spoiled day yesterday. There were Xhosa lessons and heated political debates, a Brazilian hair treatment, mani and pedi (all care of a VERY special friend), there were discussions about a trip to France for a month in July and all kinds of excitement. Along with all this I did make and photograph one of my favourite special occasion desserts as it is a special thing for me to have reached my 100th blog and am more enthusiastic than ever
This dessert is very simple in itself but with a few little tweaks it goes from being a fruit salad to being spiced citrus syrup infused segmented orange and papaya topped with vanilla and lemon zest creamed cheese and tastes like a little bit of heaven.
I am a strong believer that a fruit salad, when being served as a dessert (iow not breakfast), should not include more than two fruits (at a push three) – their texture and flavour should complement each other and they should be cut and prepared with care. I also like to make a complimentary syrup to drizzle over the fruit for them to gain a little ‘je ne sais quoi’ so to speak and set it apart from simply being chopped up fruit.
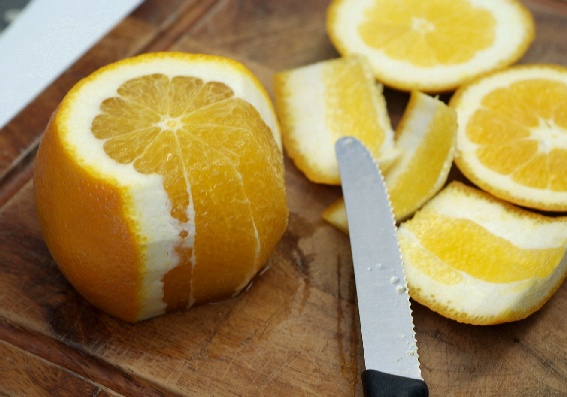
I find the combination of papaya and orange works really well, especially when the orange has been segmented, so that you don’t have the wrestle with tough pith and membranes. The papaya should have a firm texture and has calming neutral taste which is the ideal foundation for the intense tartness of the orange.
The syrup I make uses the orange juice left after segmenting the oranges and I add warming spices and sugar to make a velvety wintery infusion for the fruit.
You could simply add vanilla ice cream to this dessert but if you want to try something slightly different and very much a part of my German heritage, make a sweetened vanilla cream cheese topping. It has a silky smooth mouth feel and works so well with this dessert.
I took a few photos of the segmenting process if you are not familiar with it as it really makes all the difference and adds a luxuriousness to the humble orange.
Winter fruit salad
Serves 4
3 large oranges, segmented*
½ a large ripe but firm papaya, peeled, seeded and cut into bite size chunks
¾ of a cup of orange juice
2 Tbsp of sugar
½ tsp of cinnamon
½ tsp of mixed spice
125ml of smooth cream cheese (not the hard ‘philadelphia’ kind)
1 Tbsp of castor sugar
½ tsp of vanilla essence
1 tsp of lemon juice
¼ tsp of grated lemon zest
To segment your oranges you need to start by cutting the top and bottom of the orange off. Then cut the skin away exposing the flesh of the orange and removing the outer membrane completely. Then using a very sharp knife you cut wedges of orange out by following the line the on the membranes running into the centre of the orange freeing the wedges of orange from the membrane. See the pictures below.
Into a small sauce pan squeeze the juice from what is left of the oranges after removing the segments. You should get about ¾ of a cup of juice from this. To this add the sugar and spices and allow this to simmer for about 15 minutes or until reduced to less than half and thickening slightly.
While the syrup is reducing, cut up your papaya and add this to the orange. Mix up all the ingredients for the cream cheese mixture and set it aside until ready for use.
Once the syrup is ready, allow it to cool a little before pouring it over the fruit. Lightly toss the fruit and leave this for a few minutes before serving. You can make this a few hours ahead of time and leave it in the fridge until ready for use.


Roast beetroot and chickpea bake with rosemary and feta

Last week I mentioned having a craving for my Dad’s roasted beetroot and chickpea bake. Well I found the beetroot and have made the dish twice already. On Friday I made it as a side for a slow roast rack of lamb with a sage and mustard potato dauphinoise. It was heavenly. There were three people at dinner who don’t really care for beetroot and they all loved it.
My sister called me last week to set me straight that this dish is actually of her creation and my Dad has adopted it from her, either way it’s great and I love it.
You need to wash and trim fresh beetroot, cut it into cubes the size of dice, season it with olive oil, salt and lots of rosemary (fresh or dry). Roast the beetroot in the oven until it is just cooked through (about 10 minutes), then add your cooked or tinned chickpeas and roast this for another 5 – 10 minutes. Once out of the oven crumble some feta over it and serve! Couldn’t be easier or more delicious. I know the picture doesn’t do the dish justice but trust me – this one is a winner!
Sage and rosemary aromatic salt

Last week I bought a 30g box of fresh sage for my meat ragu. 30 grams doesn’t sounds like a lot but a little sage goes a long way. I used it to season a fabulous potato dauphinoise, a soup and a pasta but I still had half the box left over… I remembered my Mom making a herb salt with sage, so I called her and she said it was an Italian salt called Sale Aromatica…. sage, rosemary, garlic and salt all blitzed up in the blender.
I did this with about 10g of fresh sage and about 10g of fresh rosemary, 2 cloves of garlic and a cup of salt. I started by blending the herbs and garlic and then adding the salt. The smell was fabulous! I promptly sprinkled it on the cream cheese on toast and lentil soup I was having for lunch. So good! I also used it last night to make a roasted butternut and sage risotto.
I imagine it will taste great on grilled meats, on fish, on pizza, to make a herb bread, on eggs, to flavour soups and stews… It would also make a great gift. I have read that it lasts really well if you lay it out on a tray for a few hours to dry a little and seal it in a dry airtight jar.

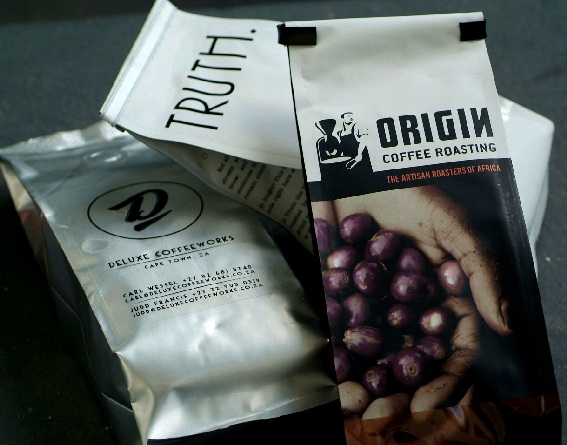
Coffee… a worldwide passion!
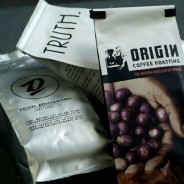
It was the birthday of a friend of ours this weekend and we decided to buy him three of our favorite local coffees as a gift. I am very much in favor of supporting local producers of most things but with these coffees I don’t feel like I’m being philanthropic in the least. They are all sensational coffees and I feel sure they can stand up with the world’s best!
Like in any family, social circle or close knit industry there is bickering, back biting and politics. I have heard loads of coffee roaster gossip and at the end of the day I couldn’t care less. All three of the below roasters produce fabulous coffee and with each new roaster who cares about their trade and educates people in how to best use their products, they raise the bar and the expectations of the consumer.
I am just grateful that we are now spoiled for choice and no longer have to be subjected to bad coffee if we can possibly help it!
I have decided to let each of the roasters we chose speak for themselves, by giving you an extract from each of their websites. My suggestions I that you make a point of visiting each of these establishments yourself and if you don’t live in Cape Town, try to track down a wise supplier who stocks their product near you, or make a point of finding out who the coffee roasters in your area are who take real pride in what they do and tell me about them!
Listed in alphabetical order…
Deluxe Coffee Works – http://www.deluxecoffeeworks.co.za/
“You should also know that we don’t follow any rules when it comes to our coffee. In fact, there aren’t many rules that we follow in general. We are passionate about coffee and we think that is good enough reason for what we do. We don’t have all the answers but we do know what we want. And that is to roast, supply and serve coffee in the best way we know how. We also believe in having a great place where we can do all this and furthermore, where you can enjoy our coffee. That is why our coffee roastery is the way it is. You won’t find any fancy food or interweb here. That’s not our vibe. Awesome tunes, interesting people and great coffee. That’s what we’re about.”
Origin Coffee Roasting – http://www.originroasting.co.za/
“Origin is an obsession. Cape Town’s De Waterkant is its home. We select speciality beans with an African focus and transform them through artisan roasting and expert preparation into an exquisite cup. Intensive barista training at Origin extends the quality of our espresso drinks and flat whites to our wholesale clients and their customers countrywide. Coffee not your cup of tea? We also have over 100 fine leaf teas from great origins worldwide.
It doesn’t stop there (did we mention were fanatics?). We offer ourcommercial clients a lasting, committed relationship, with tailored consulting on every level to ensure that your coffee competes with the best in the world. We’ve developed a school to qualify the Baristas who will pour your coffee.
If you think you know nothing about coffee, visit us. If you think you know a lot about coffee, visit us. The proof is in the cup. You decide.”
Truth coffee cult – http://www.truthcoffee.com/about/
“Not all coffees are created equal. The streets are overflowing with watery brew; and this taste-bud nightmare continues to exist because good people remain silent.
No longer! This travesty of coffee justice ends right here with this institution.
At Truth. the bitter horror of the over-roasted bean is avoided, the coarse grind is banished and poor preparation is shunned.
Say no to mediocrity!
Experience coffee as a religion.”
Traditional meat sauce with pork, sage and plum twist
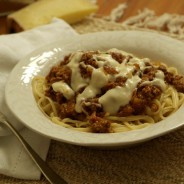
A very good friend of mine just had her first baby and I, as one does, decided to make her a lasagna so at least one or two meals could be taken care of while she and her new angel acclimatise to each other. Lasagna is not the most inspiring dish to make so I decided to improvise with the meat sauce a little and oh my word, what a winner it was! I must have spooned up at least a cup of it just in the ‘tasting’ process.
The second best part about it was that it took me 20 minutes to make it! There are three main differences to how I made it. I used a blend of beef and pork sausage meat for the base. I used sage as the herb and sweetened it with a plum and onion preserve from Chaloner. The pork, sage and plum combo just lifted the sauce to new level. If you couldn’t find the Chaloner sauce, try find a plum sauce, hoisin sauce or good chutney to substitute it with.
Luckily I had some left over meat and cheese sauce, so I whipped up myself a bowl of pasta for a late lunch. So good! This sauce would also be great as a bolognaise style sauce, cottage pie or traditional pastry pie filling.
I will add the recipe for the white sauce and method for the lasagne below – use which ever part best suits your needs best!

Meat Sauce
Makes 6 – 8 portions
1 Tbsp of oil
1 medium onion, peeled and chopped
2 cloves of garlic, peeled and chopped
½ tsp of cumin
½ tsp of coriander
½ tsp of smoked paprika
400g of beef mince
300g of Wiltshire pork sausage meat squeezed from their casings
400g can of whole peeled tomatoes
1 Tbsp of chopped sage, (2 tsp if using dried sage)
1 cup of grated carrot
1 cup of beef stock (reduce this to half if you want a drier sauce, I like my sauce quite wet)
3 Tbsp of Chaloner plum and onion preserve
1 tsp of salt (or to taste)
Heat the oil in a medium pot on medium to high heat and add the onion, garlic and spices. Allow them to fry for a few minutes. Add the meat and brown that for about five minutes or so. Add the contents of the tomato can (juice and tomatoes), the carrot, the stock, the plum sauce, and salt. Break up the tomatoes with a spoon or spatula and allow this all to simmer until the meat has cooked through and the flavours have combined.
Cheesy White Sauce
Makes about 2 ½ cups
5 Tbsp of white flour
4 Tbsp of oil
500ml of milk
2 tsp of a smooth mustard
½ – 1 cup of a grated strong tasting white cheese, I used a white mature cheddar but parmesan is the best if your budget allows
1 tsp of salt
Heat the oil and flour in a medium sized pan or pot. Allow it to fry for a few minutes while stirring the paste with a whisk. Remove it from the heat and add half the milk. Stir this with your whisk until the paste and milk have combined, then add the rest of the milk. Return this to the heat and stir it with your whisk slowly while waiting for the sauce to thicken. If it starts thickening very fast, remove it from the heat and continue stirring it until the thickening has settled down. It will reach a point where the thickness stabilises. Turn down the heat to low, add the mustard, cheese and salt and allow to combine.
In a deep ovenproof casserole dish with at least a 4 litre volume start your layering process. Start with a thin layer of meat sauce, then a layer of dry lasagne pasta sheet, then a layer of meat again, topped with some white, then lasagne, then meat, white and lasagne. The last layer should end with meat and a good layer of white sauce. Leave about a centimetre space in the casserole dish for the lasagne to expand.
Bake this in the oven at 180C˚ for half an hour or until a knife can easy pierce through the layers of pasta. You can now top this with grated cheese and grill it until it bubbles.

A juicy topic!
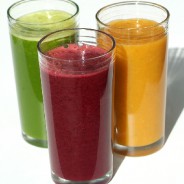
The first time I brought up juicing in a blog I got surprisingly positive feedback and yesterday I had a call from someone desperate to start juicing and needing advice. We have also all be flu’ish in the house to I decided to do some major juicing yesterday.
If you are interested in the topic of juicing and didn’t catch my blog about it, go to this link: http://www.domesticgoddesses.co.za/?p=230
After that blog I got asked about recipes for juices, so I have added a few below which are pretty nice tasting but still really good for you. Allot of people tend to err on the side of adding lots of fruit and ‘sweet’ tasting vegetables when they first start juicing. That is fine if you are making yourself a yummy juice to enjoy just because.
If you are juicing for health or weigh loss reasons, this is defeating the object completely. You need to be very cautious of adding too many fruits or sweet vegetables (ie – like carrots) as you will get a sugar spike and this will trigger cravings and also the sugar low thereafter making you feel really tiered.

The ingredients guidelines for the juices I made yesterday are:
Green juice – apple, mint, cucumber, lemon and spinach
Orange juice – oranges, carrots, tomato and ginger
Red juice – apple, carrot and beetroot
I am a hardened juicer and juice pretty much most veggies. I use cabbage allot as it is an amazing source of nutrients, but it does taste pretty strong (adding lemon helps). Also things like potatoes and celery can be odd tasting but are still really good for you!
If you have questions, please feel free to mail me at: info@domesticgoddesses.co.za
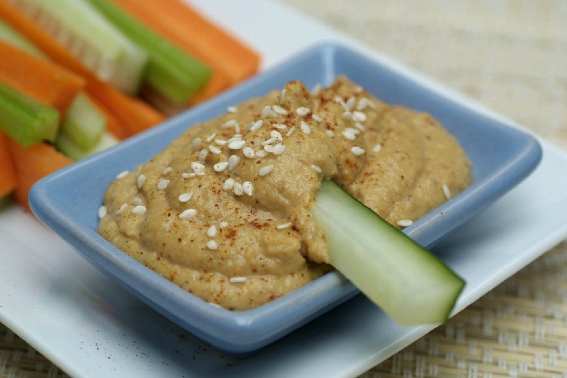
Roast chickpea and sesame hummus
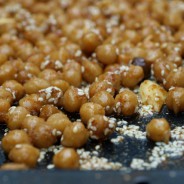
Yesterday I had a craving for a dish my Dad makes – roasted beetroot and chickpeas with rosemary, olive oil and feta. But alas after soaking and cooking my dried chickpeas and all, I couldn’t find beetroot. As soon as I do, I will make and blog about the above but the obvious thing to do with the lonely chickpeas in my fridge was to make hummus.
Despite the obvious convenience of canned chickpeas, I really think they taste a bit funny. Kind of like tinned peas don’t taste right either. If I’m in a pinch I most certainly will use tinned chick peas but if I can I soak and slow cook the dried ones. I felt like being a little experimental today so I decided to roast the key ingredients of hummus before pureeing them, as I love the flavour of roasted things. It has a nice winery hearty taste. The result was really good! It was a little bitty at first but I pureed it bit longer to get it smoother but it had all that smoky savoury flavour I had hoped for.
I love snacking on crudités with a hummus dip as an in between meal snack. You can also glam it up a little and swirl some harissa paste in the dip and reserve some of the roasted chickpeas to garnish it with (or sesame seeds and a sprinkle of paprika like I did in the pic) if you wanted to serve a crudité starter snack for guests.
Kids often love hummus too. I mix it with cottage cheese and dash of chutney which can make it more accessible to kids. It also makes a great addition to my ‘rice moosh’.

Makes about three cups
2 cups of soaked and cooked (or canned) chickpeas
2 Tbsp of sesame seeds
2 tsp of cumin
1 tsp of smoked paprika (optional)
½ tsp cayenne pepper (optional)
1 Tbsp of olive oil
2 cloves of garlic, peeled and sliced
2 Tbsp of lemon juice
1 tsp of grated lemon rind
1 tsp of salt
½ a cup of olive oil
1 ½ – 2 cups of water
Preheat the oven on grill and place the wire rack in the centre. Scatter the chickpeas, sesame seeds, spices and oil into a roasting pan and roast them for 10 – 15 minutes or until just starting to brown. Add the garlic slices about 5 minutes before the roasting is done (I added them at the beginning and they burned a little).
Blend the roasted ingredients (scrap the spices and oil from the pan into the blender too) and blend with all the remaining ingredients. Add as much water as needed to achieve the desired consistency and blend long enough to get the mixture smooth.
Hummus freezes well, so you can make extra and defrost it when needed.
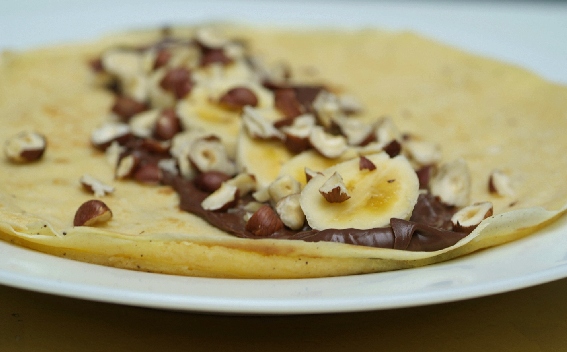
Pancakes make people happy!
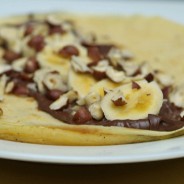
I have a few excuses for today’s immoderacies. I have a sick fiancé at home today and while checking twitter this morning, Eat Out asked what our favourite pancake toppings were. I immediately posted flambéed banana, with honey, cinnamon and pecan nuts. I then read a few other tweets and decided that pancakes would most certainly put a sparkle in ailing Adam’s eye.
While I was shopping my plans of flambéing went South as I walked past the shelf holing the Nussfit which is my preferred chocolate hazelnut spread (better than Nutella in my opnion). I also happily changed my tune to hazelnuts when there weren’t any pecans available.
The end result was barely what I had started out shopping for but never the less fabulous. I flavoured my pancake batter with cinnamon and vanilla, spread the pancakes with a generous amount of Nussfit, sliced banana and chopped hazelnuts. This was accompanied by steaming hot cups of flowery black Darjeeling tea. My boy is now tucked up in bed with the kittens again and a small smile on his sleeping face.
PS – I also bought a new pan. I have a fetish with flipping pan cakes (almost as much as the pancakes themselves) and my non stick pan is a bit scratched to say the least. So, I bought one of these ceramic coated non stick pans with no PTFE’s and PFOA’s (it sounded like the right thing to do???). It worked like a charm for my pancakes, will now see if the 5 times harder promise also holds true?
Basic pancake recipe with my twists
Makes about 5 x 24cm pancakes (scale up the recipe if you need more than that)
½ a cup of milk
½ a cup of water
1/4 tsp of salt
2 Tbsp of castor sugar
1/4 tsp of cinnamon
1/2 tsp of vanilla essence
1 cup of cake flour, sifted
2 Tbsp of butter, melted
In a medium sized mixing bowl, whisk together the milk, water, eggs, salt, sugar, cinnamon and vanilla. Sift the flour into the mixture a quarter of a cup at a time and whisk lightly. Add the melted butter at the end. Try not to over whisk once the flour is added as you don’t want the gluten to build up too much as this will make the pancakes rubbery. You can rest this in the fridge until ready for use.
Heat a non stick frying pan (24cm is a good size) to medium high heat. You can oil the pan a little to make extra sure the pancakes don’t stick but pour off any extra oil, you don’t want pools of oil anywhere. Using a soup ladle or tea cup, pour about ½ a cup of the batter into the hot pan and tilt the pan around in a fluid circular motion to spread the mixture. Pour any extra mixture back into the mixing bowl. You can trim the pancake where you poured off the mixture using the edge of a spatula to keep the round shape. This just ensures you have nice thin pancakes while still getting the batter to cover the pan evenly.
Once the pancake is cooked at the bottom, it should come loose quite easily by shaking the pan or gently lifting it with a spatula – about a minute or two. You can flip the pancake using a spatula but I love flipping them in the air. It really is fun. I have pasted a short youtube clip giving you a good idea of how to do it. Practice with a piece of bread first to get the method right if you are nervous.
http://www.youtube.com/watch?v=sTj3UzCnr4M&NR=1
Pancake toppings are a personal thing. I love the old faithful cinnamon sugar (except I use castor sugar) with lemon juice. The flambéed banana with cinnamon, honey and pecan nuts is a dream (also good on ice cream). But if you need a good excuse to buy a jar of Nussfit or Nutella, try the ones I made today.
I now happily have a three quarters of jar left in the cupboard. Nice!


