Lifestyle
Domestic Goddesses provides a holistic life style management service. We strive to assist you in creating a harmonious well balanced life though healthy eating habits, movements, home management, home décor and refurbishments.
We will consult with you about all your personal health and home needs and set out a program to relieve the stress of the admin responsibilities of creating a home environment that gives you respite from the stresses of living a highly functioning life.

Spinach vs. Swiss Chard
Not many people in South Africa know the difference between spinach and swiss chard because swiss chard has for the longest time been sold to us as spinach. Swiss chard has the long curly leaf with a thick celery like stalk where as spinach has a small flat round leaf with a thin tender stalk.
So now that we have cleared that up I will carry on talking about chard and you will know what I’m talking about.
Chard grows really well in coastal regions with a high rain fall, hot summers and mild winters. This explains why we have so much of it in South Africa and why it is also a great option for home gardens. It easy, hardy and looks really pretty too. Stodels Garden Center has a great selection of home veggie gardening solutions and has extremely knowledgeable staff who can help you get set up.
Both my father and my sister have a had a massive crop of chard over the summer and asked my advice on how they should use it.
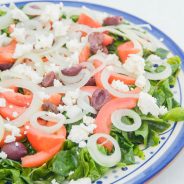
One of the applications I suggested was to use the swiss chard in salad. I think swiss chard salad recipes are still a little rare as it is an unusual choice for a leafy green, but one worth a try.
This swiss chard salad is unique as the leaves are blanched (to tenderize them) and then marinated which makes this salad just that bit different and special. It is a great addition to serve with Mediterranean style foods, like rare roast lamb and crispy grilled potatoes wedges, or with a braai and crusty bread.
Swiss Chard Salad

Serves 6:
2 Tbsp. Olive oil
2 Tbsp. Balsamic vinegar
2 Tbsp. Olive brine (the water the olives come in)
1 Tbsp. Sugar
1 tsp. Salt
1 clove of garlic, minced
A healthy grind of black pepper (optional)
About 20 leaves of Swiss Chard, extremely well washed and drained, stalks cut out
1 medium onion, cut into rings
3 small ripe tomatoes, cut into wedges
A large hand full of black pitted olives
1 cup of loosely broken up feta
Put a medium pot or deep pan with about 5cm of water on the stove to heat to a low simmer. Combine the first six ingredients in a bowl and set aside.
Blanche a few swiss chard leaves at a time for a minutes or two in the simmering water until tender but still bright green in color. With a slotted spoon drain the chard leaves, shake off the excess water and dunk into the marinade. Then arrange each individual leaf into a loose clump on a platter. Continue until all the leaves have been blanched, marinated and arrange evenly over the platter.
Pin for later!


I am pretty lazy in the kitchen.
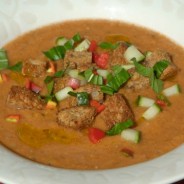

So that’s how my rustic gazpacho recipe came about. FYI, I only just came up with that name – ‘rustic’ gazpacho – it gives my laziness as certain provincial charm, I think.
For those of you who are not familiar with Gazpacho, I think it is safe to say that it can be challenging if you are not familiar with cold soups but once you get over the initial desire to microwave it for a few minutes and allow yourself to be enveloped by its chilled, tangy, crisp fullness it can become something of an addiction after a while.
Beyond liking it, I love it, especially on scorching summer days where being in a hot kitchen cooking is just not an option. If making it my way, you can whip up a massive pot of in just 10 minutes.
In the recipe below I am going to give you my version. For a more traditional version peel and seed the tomatoes and the cucumber, and use white bread.
Gazpacho
Makes about 2 litres
500g of ripe tomatoes, quartered
¼ of a cucumber, cut into chunks
½ a red, yellow or orange pepper, seeded and cut into chunks
1 clove of garlic, peeled
¼ of a small onion
4 slices of brown or whole wheat bread
750ml of vegetable stock
¼ of a cup of olive oil
1 Tbsp sugar
1 tsp of salt (my recommendation)
Milled black pepper to taste
A pinch of cumin
1 cup of ice cubes
5 fresh basil leaves (optional)
For garnish if using
Cubed cucumber
Cubed bell pepper
Brown or whole wheat bread croutons
Drizzle of olive oil
Blend all the ingredients together and check the seasoning. Refrigerate and serve chilled. For a colourful and crunchy finish serve with croutons and some of the ingredients like cucumber and peppers diced up.
For perfect croutons pre heat the oven on grill. Cube up the bread and toss in a bowl with a drizzle of oil and some salt and/or seasoning of choice. Spread on a baking sheet and grill until crisp. Keep a close eye on them as they can burn easily.
Recreating a memory.
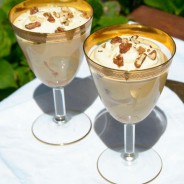


We had a family lunch yesterday and I decided that I needed to make my late grandmothers trifle. When I say needed I mean that in the literal sense. This trifle was the dessert I would request for my birthday every year and looked forward to at Christmas and other special occasions. Sadly, it has been many years now that I have not had the pleasure of my beloved granny or her trifle. It needed to be made.
Luckily I remember the recipe pretty well and aside from a slight deviation with the custard recipe, which I made in the traditional manor rather than hers, it was pretty damned spot on.
If there is one word to describe this trifle it is ‘light’ – the colour, the texture, the taste – is light. It’s not too sweet and not too rich and the perfect way of ending off a special meal.
In the recipe below I have not added a recipe for custard as I have decided that I need to spend a little time with the topic, as we had differing opinions around the table on how to tackle home-made custard. I feel it deserves further research and experimentation before I give you my opinion and tested recipes.
Pear and Walnut Trifle
Serves 4
8 boudoir biscuits
40 ml of Smooth apricot jam
80ml of semi sweet white or rose wine (if you don’t have just sweeten some dry white or rose a little)
1 tin of pears in syrup
50g walnuts, roughly chopped
2 cups of vanilla custard – bought or home made
125ml of fresh cream, lightly whipped
1 tsp of castor sugar
Decide if you want to serve the trifle in individual portions or a single bowl. Spread a little apricot jam on the boudoir biscuits and place them at the base of the bowl. Mix the wine with a little of the syrup from the pears about 2/3 wine to 1/3 pear syrup. Spoon the wine over the boudoir biscuits and allow the mixture to be absorbed into the biscuits. Pour the custard over the soaked biscuits. Slice the pears over the custard and distribute evenly. Sprinkle half the roughly chopped walnuts over the pears. Allow this to cool in the fridge until just before serving. Top with the whipped cream (not too stiff sweetened with the castor sugar) and sprinkle the remaining nuts on top.
If you are increasing the recipe for more people, carry on layering the biscuits and custard but keep the cream only for topping.
If making your own custard try this link for a good recipe – http://www.taste.com.au/recipes/81/traditional+vanilla+custard
Is life too short to make home-made pasta?
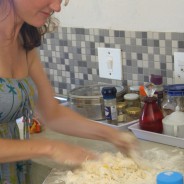


I am in the camp of people who believe that life is too short to make home-made pasta. I evaluate things like this on a time spent to reward ration. Some things are, despite the extra time spent on them, just worlds better when made from scratch… and pasta, in my opinion, is not one of those things. It is however for some people a passion and I thought I better just give it one more try before dissing it publicly.
Since I had never made lasagne with fresh pasta I decided to try that. I called my pasta cousin, Annika, we poured the wine and we got started. For the filling I had wanted to experiment with something new and had three ideas but just couldn’t decide which one to do. So I decided to do all three – since lasagne is a layered affair – why not? The layers were to run as follows: béchamel, pasta, chopped walnuts, béchamel, pasta, herb roasted veggies, béchamel, pasta, fresh pesto, béchamel, pasta, béchamel, grated white cheddar. I know… what was I thinking… my poor hips.
So that was the strategy now we needed to start with the pasta. I made the dough which is pretty easy (recipe below) but Annika told me that she had read that resting the pasta dough for two hours was said to be essential. So while we rested the dough we made the fresh pesto, drank some wine, chopped and roasted the veggies, drank some wine, made the béchamel and drank some wine.
Time to make the pasta sheets – enter the pasta machine. Rolling out pasta by hand is just too difficult. I have done it ‘rustic style’ a few times and it’s just not nice. With a pasta machine it is easy, fun and a great place to kids involved. After some research on the internet we had decided to follow the method where you pre-blanche the pasta sheets before assembling the lasagne and I think that served the final product well.
The assembly process went really smoothly as we had had plenty of time to get prepared while waiting for the dough to rest. A token salad was tossed together while the pasta was in the oven and soon we were dishing up sticky squares of sin on a plate! It was DELICIOUS but hopelessly too rich. I am now sure that adding cream and grated cheese to my béchamel had not been the wisest move.
The verdict after dinner was that one needs to view home-made pasta and dry store bought pasta in two different camps. The dry version is perfect for every day meals. The home made version is a fun activity – you should have the time, the wine and the company while making it. You should also make double and freeze or dry the rest for future consumption. Above all you should make it special – the kind of meal you would usually not make for dry pasta.
In this case it’s about the journey not the destination, so make the most of it if you going to try it.
Fresh Pasta
Enough for one big lasagne for 8 people
3 cups of flour
4 eggs
1 ½ of salt
Make a well with the flour, crack in the eggs, add the salt and knead until a firm dough forms. Rest for two hours before using for best results.
Make the desired pasta according to the instructions on your pasta machine.
Miraculous seeds
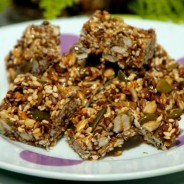


Oh no, I think I’m in trouble… I was browsing around for info around omega mix seeds and happened to stumble on a recipe for omega seed brittle – as if I needed another application for seeds in my cooking… I have just made a batch and they are cooling in the fridge. From the scraps I tasted from the spoon and pan, this could be my newest sweet fix. I keep telling myself it could be worse, at least the seeds are jammed with plant based natural essential fatty acids and fibre. I’m going to ignore the calorie count.
Most supermarkets and health shops stock a mixed pack of seeds usually containing flax, sunflower, sesame and pumpkin seeds – some have added linseeds, soy nut chips, rape seed, chia seed, whatever the mix it’s probably good for you and they taste GREAT!
I use them in savoury and sweet dishes or plain as a snack. I do however prefer them toasted, it gives them a far nuttier taste.
When using them for savoury dishes I like to toast them with a little olive oil and add my favourite spices or spice mixes and a pinch of salt. I always double up quantities and keep the rest in a tupperware to have for quick use.
I love to use the mix as a Dukha with olive oil and bread for dipping. It is perfect to sprinkle on salads. Substitute it for pine nuts in pesto sauce. It makes a great garnish on soups and it’s a super snack for lunch boxes.
I love to add dry toasted plain seeds to my breakfast cereal, fruit salad and smoothies and where ever I can I add it to my baking to give it a slightly healthier twist. And now… the dangerously easy seed brittle!
Seed Brittle
Makes 20 small squares (10 of which I have already eaten,,, help!)
½ cup (125ml) of Omega mix seeds
2 Tbsp (30ml) of honey or golden syrup
A pinch of cinnamon or chai spice
Lightly toast the seeds in a pan until browning slightly. Add the spice and then the honey or syrup and stir the seeds around the pan for about 5 minutes allowing the honey to caramelize and the seeds to be fully coated. Be careful not to burn the honey. Remove the pan from the heat if you see the honey bubbling dark brown or smell burning sugar, stir thoroughly and pour out onto a greased baking tray. flatten and compress the mixture using a greased spatula and allow to set in the fridge, cut into squares of about 2cm2 and store in an airtight container.
These are perfect for a healthier option for a sweet fix and I will be trying it crushed up on ice cream soooooon!
Shades of Green.
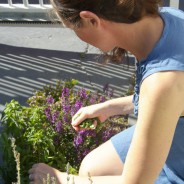


While I write to you, I am busy chomping on a bowl of pasta with basil sauce and am wracking my brain as to what to focus on in today’s blog. Should I expound on the marvels of basil, one of the most versatile and luscious herbs, or on seeds which are one of my favourite and most used sources of omega oils, or on pesto and pesto style sauces without which life would not be quite as rich… Books have been devoted to each individual topic! Okay, basil it is as my basil plants are in full flourish right now and deserve a little lime light.
Basil is one of the herbs you simply must have growing at home (if at all possible). It loses its flavour with most preservation methods and is such an easy plant to grow – so do! I buy little basil plants in spring from Stodels Garden Center (I love shopping there, super knowledgeable staff and awesome selection of plants and accessories ) and within a month or two after planting I have more basil than I can use!
The staple use for basil in my kitchen is pesto style sauces! I have come up with every variation on the basil sauce theme but one of my favourites at the moment is the combination of toasted seeds, feta, garlic, olive oil and loads of fresh sweet basil. Yum! (recipe below) But the uses are endless – add basil to most pasta sauce – bought or home made. Add it to your cheese and tomatoes sandwich – or any other for that matter. Add it to salads or make a classic caprese. Add fresh on top of soups. Basil can enrich most meat sauces , stews and gravies if chopped and added shortly before serving. You can even add it to drinks – it’s yum added to a mojito!
Okay, but for starters let me give you the recipe for my basil sauce de jour.
Feta, Toasted Seed and Basil Sauce
Makes about a cup
Two handfuls (tightly packed) of fresh sweet basil, washed
1 round (about half a cup) of feta
½ a cup of toasted seeds (omega mix – flax, sesame, sunflower, pumpkin)
1 large clove of garlic, peeled
60ml of olive oil
60ml of water
½ tsp. of salt
For the toasted seeds – either lightly dry fry them in a hot pan until they start to brown or for a spicier version fry them with a dash of oil and add a little cayenne pepper, turmeric and cumin.
Combine all the ingredients in a blender jar and blend with a stick blender. You can of course blend them in a combi blender too – but it’s allot more messy.
The sauce can be kept for at least a week in an air tight container in the fridge. Add it to pasta, use as a dip diluted with chunky cottage cheese or hummus, add a dollop on a steak or with a grilled chicken breast. Use on sandwiches or add a dollop into your soup. Use to add flavour to salad dressing. Toss with steamed or roast veggies.
Several pieces of heaven… and then a few more!


Yesterday was quite a day! I got officially spoiled rotten by my delightful, cousin, friend, confidant, fellow food and pampering enthusiast, Annika! She had arranged a belated birthday day of indulgence for me.
We started with a Bikram yoga class given by hers truly at Jai yoga studio – the facilities and environment are sublime and her teaching is world class.
Then we meandered off to Café Milano for lunch which is a new café at the top of kloof street and is a collaborative venture by Giorgio Nava and Vanessa Quellec. I have been a fan of Vanessa’s work since I first sunk my teeth into it at Roundhouse. Man, am I glad that she is baking for popular consumption again! I would easily say that she is the top pastry chef and baker in South Africa. You really haven’t tasted pastry until you have tasted Vanessa’s pastry! We ended up discussing strategies of how I could get Vanessa to let me work in their bakery for a few days to see how she does it. The cherry on top was Giorgio handing us both a complimentary packet of rolls as we left. It may have been their surplice but it still made us feel special!
I was then whisked off to the newly refurbished Equinox Spa at the Cape Royale Hotel where we have a ‘couples’ pedicure – so we could carry on with a steady flow of girly banter while getting our tootsies tended to. The setting is fresh and modern and the pedicures professional and thorough.
A cocktail at the ‘Sky bar’ of the Cape Royal seemed the logical next step – this is where the girl talk started to get a little naughty but I’m blaming the apple and cinnamon daiquiri’s which were way yummier than I had expected.
Next we went back to Annika’s place to freshen up before dinner while sipping on chilled glasses of pinot noir. I was pretty excited by the wine as I have never heard of it. The Yardstick 2009 by Klein Contantia. It was perfect served straight from the fridge on such a scorcher of a day, and light yet full of flavour.
The evening concluded at La Mouette in Sea Point for six course tasting menu. It was fabulous, from the service to the bread. The food was perfectly presented and the flavours adventurous without being outrageous. Annika and I were both blow away by the sweet breads and I was all over the gin and tonic pre dessert. To top it all off the full six course menu was only R210, what’s not to love.
I was chauffeured home tipsy, full of deliciousness and pampered to the max – I am so blessed!
Mini bacon and cheese quiche


Quiches are really easy to make and once you understand the basics you can get creative and adapt the recipe to suit your taste and needs.
I have added some video links of the blind baking process so you can get it right first time. There are so many cooking related demo’s online – you really shouldn’t struggle with any methods these days! I deboned a leg of lamb the other day after watching a 2 minute long online demo! Was very chuffed with myself.
Quiches freeze beautifully so I always make double and freeze the rest.
Makes about 12
1 roll of frozen puff pastry (brown if they have) – defrosted
1 pack of streaky bacon
2 cups of cheddar cheese, grated
Spinach (optional) – blanched and drained
Butternut (optional) – cut into small cubes and lightly steamed
2 cups of milk
1 tsp of flour
4 eggs, lightly beaten
1 tsp of veg or chicken stock powder
1 tsp
A pinch of All Spice (optional)
Salt and pepper to taste
Grease a muffin tin and ‘spray n cook’ it too if you have.
Lightly roll your pastry out on a floured surface. Cut squares out of the pastry and place them into the muffin tin. Gently pull the straight sides of the square in a little to give it a pretty scalloped look and with your finger tips lightly press the pastry to fit the mould.
Blind bake the pastry. To see how check out these two links:
Traditional blind baking
http://www.youtube.com/watch?v=Zb0jp18Va6Q&feature=related
Silicone mold easy version
http://www.youtube.com/watch?v=pCDeJhGWFEA
Pre heat your oven to 200˚C and pace the wire racK in the middle of the oven.
For the filling, chop and fry the bacon until crispy. Remove the bacon from the pan but reserve the cooking fat in the pan. Add milk to the pan (no heat) and stir till it combines with the bacon fat. Add a teaspoon of stock, mustard, a pinch of salt, a pinch of all spice and lightly whisk in the eggs and flour. If using spinach and or butter nut, wash, steam and chop the veggies. Add the bacon and veggies to the quiche crusts. Fill each of the pastry crusts with the egg and milk mixture and top with the grated cheese.
Bake in the preheated oven until set and golden on top, about 10 – 15 minutes. Allow to cool before unmolding the quiche.
Quick, easy, versatile, not too sinful and delicious!
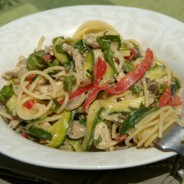

The fridge at the home I was training in was full of red peppers, so I added some of those to the sauce which gave it great colour and nice body.
Mushroom and courgette creamy pasta
Serves 6
500g of pasta, cooked and drained
2 Tbsp. of oil
1 small onion
250g mushrooms, washed and sliced
Black pepper
1 Tbsp. of soya sauce (optional)
a pinch of salt
250g courgettes, washed, topped and tailed and cut into ribbons
1 cup (250ml) of crumbled Feta
1/2 cup (125ml) of Milk
Heat the oil on high heat in a large pan and fry the mushrooms and onion for 10 minutes or until they have reduced to half their size and are browning slightly. Season with black pepper, salt and soy. Add ribboned courgettes and fry gently for a few minutes. Crumble the feta over the mixture, add the milk and gently stir until the feta has melted and the sauce us slightly thickened and ready to pour over the cooked past of your choice.
You can add or substitute things like green beans, peppers, broccoli, butternut etc. for extra veg, or add bacon bits or chicken while frying the mushrooms for a meaty version.
PS – if you want this recipe in a nice printable word format, please e-mail me at info@domesticgoddesses.co.za and I will gladly mail it to you.
Waste not, what not!