Lifestyle
Domestic Goddesses provides a holistic life style management service. We strive to assist you in creating a harmonious well balanced life though healthy eating habits, movements, home management, home décor and refurbishments.
We will consult with you about all your personal health and home needs and set out a program to relieve the stress of the admin responsibilities of creating a home environment that gives you respite from the stresses of living a highly functioning life.

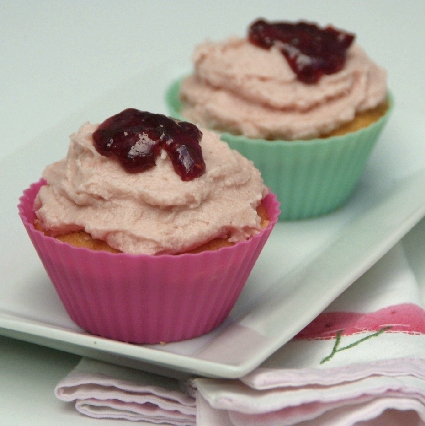
Lemon scented cup cakes with raspberry jam centres
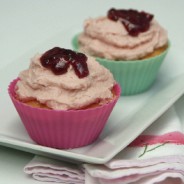
Last week Adam had to go on a very last minute work trip which is going to take him away over his birthday. So I decided to have a mini birthday party for him the afternoon before he left. I bought him a whole lot of little presents, baked him a batch of cup cakes and set a birthday tea table for him so we could spoil him a little.
I had to improvise the cup cakes as they were a spontaneous idea and I really didn’t feel like leaving the house to go shopping, so I just made do with what was in the cupboard. I think the result was pretty good.
I have wanted to make filled cupcakes for ages, so I browsed the internet for various methods and settled one which looked fool proof to me. I had some lovely raspberry jam which I settled on as a filling and then decided to try a raspberry icing as well. All the methods used fresh raspberry puree but in its absence I just used the jam softened in the microwave and strained the pips off.

I was going to make vanilla cup cakes only to find out I was out of vanilla so I decided to do lemon scented cup cakes instead.
Adam was delighted and decided to enjoy his tea in the pimp daddy robe I had bought him. We will miss him terribly.

Lemon scented cup cakes with raspberry jam centres and
raspberry butter icing
Makes about 8 medium cup cakes
125g of butter (room temperature)
½ a cup of castor sugar
2 large eggs
2 Tbsp whole milk
Finely grated zest of one medium sized lemon
2 Tbsp of freshly squeezed lemon juice
1 cup of cake flour
1 tsp of baking powder
4 – 6 tsp of raspberry
85g of butter (room temperature)
1 cup of icing sugar, well sifted
2 Tbsp of milk
4 Tbsp of raspberry jam
1 tsp of lemon juice
Preheat the oven to 180C˚ and place the rack in the middle of the oven.
With a cake mixer, blend together the butter and castor sugar until light and creamy. Add to this the eggs, vanilla and milk and blend to combine. Add the baking powder and cake flour and blend until smooth.
If you are using cup cake papers, place the papers into the holes of a muffin tin. If using silicone cup cake moulds place them onto a baking tray or into a muffin tin.
Spoon the mixture into the cup cake moulds until ¾ full. Flatten the mixture and push it up the sides of the moulds as much as you can with the back of a spoon.
Bake for 15 – 20 minutes until golden and springy.
Allow to cool, I put mine into the freezer for 10 minutes to speed up this process.
For the raspberry icing – Microwave the raspberry jam until it is runny. Pass it through a sieve to strain off the seeds. Refrigerate the jam until it has cooled. Blend together the butter and sifted icing sugar, add the milk and blend until just smooth. Do not over blend as the icing can split.
Add the lemon juice and raspberry jam and blend until combined. Set aside until ready for use.
To jam fill the cup cake – Microwave your raspberry jam for a few seconds to soften it a little. Using the process suggested in this link – http://bakingbites.com/2007/09/how-to-make-filled-cupcakes-step-by-step/
Cut a cone shaped plug out the top of the cup cake, spoon about ½ a teaspoon on jam into the hole. Cut the cup off the plug and cover the jam filled hole. Ice the cup cake as normal covering the plug.
I added a dollop of raspberry jam to the top of each cup cake just before serving.
When only the best will do!
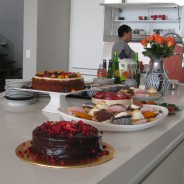
This week I helped one of my clients prepare a traditional Eid luncheon for her friends and family. It was such a spectacular day and a real role reversal for me as I was learning how to cook her recipes! I plan to recreate the menu for my friends some time soon as it was such a delicious spread.
The only recipe which was mine was the cheese cake for dessert and I was rather nervous about it as it was such a special day; I would have been mortified if it had been a flop. Luckily it was not! So I want to share the recipe with you as it was a truly memorable cake (and I am pretty fussy when it comes to cheese cake).
It is pure sin but a little goes a long way and for a celebration sometimes only the best will do!

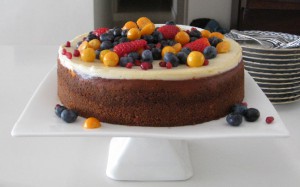
Traditional Cheese Cake
Serves 12 generous portions
Crust
300g Tennis biscuits or digestive biscuits or ginger biscuits
125g butter, melted
A pinch of ground ginger (optional)
A pinch of mixed spice (optional)
Preheat oven to 180C. Crush biscuits in a food processor and mix with melted butter and spices if using. Line the bottom of your 24cm spring form cake tin with grease proof paper. Spread ¾ of the way up the sides and bottom of tin. Bake crust on the middle rack for about 15 minutes or until set. Remove and cool thoroughly.
Filling
3 cups (750ml) smooth full cream cottage cheese or any thick smooth cream cheese
1 cup (250ml) crème fraiche or thick sour crème
2 Tbsp (30ml) fresh lemon juice
2 Tbsp (15ml) lemon rind
1 Tbsp (15ml) vanilla essence
1 cup (250ml) cream
2 Tbsp (30ml) flour
2 Tbsp (30ml) corn flour
4 eggs, beaten well
1 ¼ cup (312.5ml) castor sugar
Preheat oven to 180C.
Gently beat the cream cheese with the crème fraiche, add the juice, rind, cream and flour. Whisky the eggs with castor sugar and add to the cream cheese mixture. Beat gently until smooth.
Pour filling into the pre baked crust and bake for 15 minutes, then reduce the temperature to 140C˚ and bake for a further hour.
Sour cream topping (optional but just finishes the cake beautifully)
2 cups (500ml) sour cream
4 Tbsp (60ml) castor sugar
1 tsp (5 ml) vanilla essence
2 Tbsp of original maple syrup (optional)
1 pinch of ground ginger (optional)
Gently stir the ingredients together and pour over the cake while it is still warm. Then leave it in the oven for an hour with the oven turned off. Remove from the oven and refrigerate. Top with fresh berries before serving.
Entertaining made easy!

Wow, what a weekend – I am completely exhausted but it was all worth it. We haven’t been entraining much in the last while and somehow we ended having three gatherings at our place in a row, pretty much coincidentally.
On Thursday I had quite a busy day and knew I would only get home late so I pre-prepared my fail safe Butter Chicken Curry with steamed rice and sambals and bought a slab of Cote d’or chocolate.


On Friday Adam and I cooked together with starters of Vietnamese spring rolls followed by a wild mushroom Laksa and ending off with a vanilla ice cream topped with amaretto and coffee. It was a surprisingly easy meal and right up my alley, flavours wise.

All the above meals took between 30 minutes to an hour to prepare and were so satisfying. Colourful, tasty, relatively well balanced and pretty inexpensive too. My guests were happy and I was happy that I hadn’t had to spend too much time preparing. Think I will be doing a lot more entertaining this spring!
I did also make a short video on how to make Vietnamese spring rolls as I have had many unsuccessful attempts before; and following this technique has made it so much easier for me.
Vietnamese Spring Rolls
Makes 10
100g of rice vermicelli noodles
¼ cucumber, julienned
Small bunch of spring onions, cut into diagonal pieces
Fresh coriander, mint and/or basil leaves, washed and picked
1 large carrot, julienned
1 cup of finely shredded cabbage
100g unsalted peanuts, roughly chopped
8 Spring roll rice rappers
Dipping sauce
¼ of a cup sweet chilli sauce
¼ of a cup soya sauce
2 Tbsp lemon juice
1 clove of garlic
1 cm of fresh ginger
Bring a medium pot of water to boil. Boil rice vermicelli 3 to 5 minutes and drain.
Fill a large bowl with warm water. Dip one wrapper into the hot water for 1 second to soften. Place the wrapper onto a plate and leave a few minutes until the wrapper is tender and pliable. In a row across the center, place a handful of vermicelli, fresh herbs and other ingredients leaving about 6cm uncovered on each side. Fold the uncovered sides inward, then tightly roll the wrapper.
In a small bowl, mix the dipping sauce ingredients.
Home made mayonnaise in minutes!
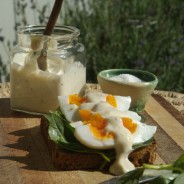
There are some cooking methods which are just so much easier to demonstrate than to explain in writing… making mayonnaise the quick and easy way is one of those. I got Annika to video me on Tuesday doing just that. Please note – this is NOT a professional video and it was done first time, no practicing or editing, so please don’t laugh… feeling a bit insecure about my first vlog (video blog)! This is just me at home, feeling a bit awkward, so view it as such.
Okay, so check it out and let me know if this will encourage you to try this yourself, the mayonnaise that is?

The ingredients in the recipe which I made on the vlog (more or less)
1 large egg
1 cup of oil (3/4 sunflower; 1/4 olive oil)
1/2 a tsp of salt
1/2 tsp of black pepper
2 cloves of garlic
1 Tbsp of lemon juice (and perhaps a little more)
a piece of lemon rind
1 heaped tsp of smooth dijon mustard
1 tsp of Worcestershire sauce
1 Tbsp of parmesan grated
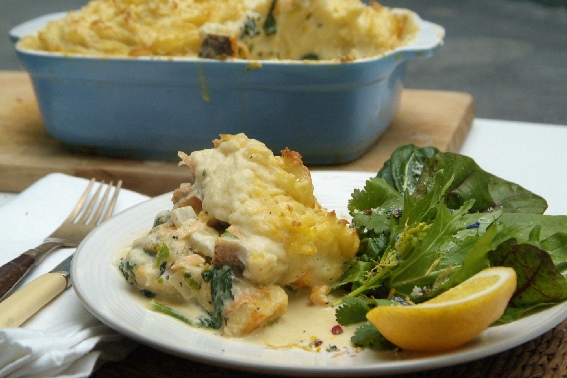
Creamy fish pie

Fish pie has never really been a thing I yearn for. Well, fish and seafood in general aren’t the first thing I think of when I crave my favorite foods. But, my personal yearnings aside, fish pie is a dish which seems to be such a firm family favorite in most homes with any Anglo Saxon origins, that it is a dish I need to know how to make.
I did write a post a few months back on a fish pie, but that was a low fat and low GI version. I recall it being a really good one too, but today after reading a blog about traditional fish pie I decided I needed to make the real thing. I had some frozen haddock in the freezer and most of the other ingredients in the fridge, so I set to work.
The cooking process was remarkably quick and the results extremely satisfying on the cold and raining day we had today. As for the richness of the meal, it made it all the more filling, so I ate less and had added a salad as a side dish. Very happy with this meal.

Fish Pie
Serves 4 – 6
4 medium potatoes (about 700g), washed and peeled and diced
1 Tbsp of oil
1 Tbsp of butter
1 medium onion, peeled and chopped
2 cloves of garlic, peeled and chopped
1 large carrot, grated
1 rib of celery, finely sliced
250ml of cream
1 Tbsp of fresh herbs, like dill or parsley
1 tsp of salt (or to taste)
½ tsp of black pepper
150g of English spinach, washed and drained
500g of haddock, cut into bite sized pieces
2 Tbsp of butter
2 tsp of smooth Dijon or mild mustard
½ tsp of salt
¼ tsp of curry powder
Start your potatoes simmering in a medium pot of water. While the potatoes are boiling, heat the butter and oil in a large pan. Add the onion, garlic, carrots and celery and fry gently for about five minutes until the onions turn translucent. Add the cream, seasoning and spinach and allow them to simmer until the spinach starts to wilt. Add the haddock, stir to combine and turn off the heat, allowing the fish to be cooked further by the heat in the pan.
Pre heat your oven to 220C˚ and place the rack in the middle of the oven.
Once the potatoes are cooked through, drain them, add the butter and mash them until smooth. Add the salt, mustard and parmesan, as well as a ½ cup of the cream sauce from the fish mixture and stir to combine.
In a medium casserole dish spoon the fish mixture and using a fork, top with the mashed potato.
Bake this in the oven for about 20 minutes or until it has started to brown on top.
I also place a baking sheet under the dish as the mixture can bubble up and run over the edges some times.
Allow to cool for a few minutes before serving.

Life is too short to eat average cake!
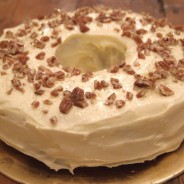
This weekend we were invited to a birthday dinner of friends and I suggested baking a cake for the event. The birthday boy requested a carrot cake and luckily enough I had a killer tried and tested carrot cake recipe on file.
The recipe is nothing short of pure sin, but when it comes to cakes I believe that a small piece of fabulous cake is so much more worthwhile than a big piece of average cake. In fact I think life is too short to eat average cake at all.
As part of the decoration I used edible gold glitter and even though it’s a bit cheesy, it makes me so happy!

Carrot Cake
2 ½ cups (625ml) cake flour
2tsp (10ml) baking powder
1 ½ tsp (7.5ml) bicarbonate of soda
1 Tbsp (15ml) mixed spice
1 tsp (5ml) salt
1 ¼ cups (312.5ml) sugar
1 ¼ cups (312.5ml) of oil – a neutral tasting vegetable oil
4 large eggs, at room temperature
2 cups (500ml) grated carrot
1 cup of fresh grated pineapple or crushed tinned pineapple drained
½ cup (125ml) chopped pecan nuts, reserve some for decorating the cake
¼ cup (62.5ml) smooth apricot jam
Preheat your oven to 190C˚ and place the rack in the middle of the oven.
Sift the dry ingredients twice. Beat the sugar, oil and eggs together until well blended at high speed for 3 minutes. Add the carrots, pineapple, nuts and apricot jam and mix well. Sift the dry ingredients over the mixture and fold it in with a spatula.
Pour into a greased cake tin (28cm spring form tin or two loaf tins), bake at 45 min. Allow the cake to cool in the tin before unmoulding. Ice the cake once completely cool.
Cream cheese icing
¼ cup (75ml) butter
250g of cream cheese
3 cups of icing sugar (sifted)
1 tsp (5ml) vanilla essence
A squeeze of lemon juice
Blend all the above ingredients until smooth but don’t over beat as it may split. Keep the icing fairly cool as it will keep it’s shape better.

Best scones I have ever tasted!

I have written about scones before, but did also mention that it was my Mom’s recipe and when I wrote about them, she had baked them, not me. I have since baked them myself and trained them with overwhelming success and enjoyment. I have very slightly amended the original recipe I posted and have to urge you to give them a try.
The secret is to follow the recipes instructions to the letter. Read the recipe from start to finish, do all the preparations necessary, use measuring cups and spoons, set the timer on your oven so you don’t over bake them.
It is actually not a lengthy preparation or baking process (you just need to get organised first) and aside from the jam and cream you put on top, they are low in both sugar and fat. So if you value my judgement at all and if you have eaten too many bad scones in the past, let this recipe rekindle an age old tradition for you.
Do it, I certainly am on this rainy cold Cape Town weekend!

Colleen’s Scones
Serves 6
2 cups of flour (bread or cake), sifted
1 Tbsp of sugar
½ tsp of salt
2 tsp of baking powder
75g of butter, cold and cut into very small cubes
1 large egg
¾ cup of milk (a little more if needed)
2 tsp of lemon juice
Pre heat your oven to 190C˚ and place the wrack in the middle. Grease and flour a baking sheet.
Ensure that all the wet ingredients are as cold as possible and get everything ready before you start. Whisk together the milk, egg and lemon and keep it in the fridge until ready for use.
Sift together your dry ingredients. Add your cold butter and lightly work it into the flour by rubbing it between your fingers. Lift the mixture in your hand high above the bowl letting the crumbs fall down as you rub them between your fingers (this adds air into the mixture). Don’t over rub the mixture, the butter should not melt but rather just be in very small crumbs covered with flour.
Add the milk mixture and combine the ingredients with a regular dinner knife, cutting and mixing until the ingredients are just combined. Add a dash more milk if the dough isn’t combining sufficiently.
Scrape the mixture onto the baking sheet and using a floured spatula or your finger tips, lightly flatten the mixture to about 2 cm thick. Then score (cut) the mixture half way through (1cm) from the top using a knife to form squares of about 3 – 4cm.
Bake this for 15 – 20 minutes until just baked through and golden brown on top. Check the done’ness with a skewer or small knife.
Serve immediately if possible with your favourite jam and lightly whipped cream with a dash of vanilla and sugar added.
Breathless for broth

I am crazy about brothy soups and under that classification I would also put many asian soups and consommé’s. There is something incredibly refreshing and satisfying for me about a well flavoured broth with your favourite meats, veggies or starches added to it. It also looks great, this clear shimmering steaming liquid with bright colours and textures appearing through it. Okay, I may be over doing it a tad now, but I have just scoffed down three bowls and am feeling a little heady and romantic now.
What I made for lunch was a quick fix, in broth terms, but no less sensational. I think the secret is to have the best quality stock you can afford at hand or a great Asian soup paste. Then add whatever meaty, veggie or starchy things you like. I like to add a lot of my ingredients after the broth has been completed, so they are warmed through but still have great texture and fresh flavour.
I was fortunate to have had a special delivery from Germany of porcini stock paste which is what I used for my broth but I also can’t say enough about the NoMU Fond range. They are worth their weight in gold and you would do well to have the whole range in your cupboard at all times. I have written my recipe below, but this really should be tailor made to your specific tastes. I do however highly recommend the addition of fresh avo – it is soooo very yummy, nutty and creamy.

Broth a la Thekla
Serves 4 starter portions or two main course portions
2 tsp of your best olive oil
1 Tbsp of butter
6 large button mushrooms, thickly sliced
½ a medium onion, cut into petals
1 large clove of garlic, thinly sliced
Lots of black pepper and a little salt
500ml of your favourite fond/stock/Asian soup base (try not to skimp here) and taste this before you add it, it needs to taste rich. Some stocks need a heavier hand when reconstituting them to make a good strong broth.
¼ of a large carrot, halved and thinly sliced
½ a cup of frozen corn (I always have a packet in the freezer)
¼ of a firm (but still ripe) avo cut into cubes
½ a cup of cherry tomatoes, quartered
I nicked a few small bok choy leaves from a baby Asian leaf salad pack too
Heat the oil and butter in a medium pot on medium high heat. Fry the mushrooms with lots of black pepper and a touch of salt until they start to colour a little, then add the onion and garlic and fry until translucent. Add the stock, carrots and corn and simmer until all the flavours have combined. Switch off the heat, ladle the soup into bowls, top with the avo and cherry tomatoes (and a little bok choy if you have) and eat immediately.
Back from such a fabulous trip!

I’m back from three weeks of nonstop training in Johannesburg! Wow, it has been exhilarating, exhausting and exciting. I already miss the vibrancy of the people and the place and am busy planning my next trip up for October. I am almost fully booked already, so if any of my Joburg readers are keen for me to do some training, let me know soonest!
While I was in Joburg I trained mostly housekeepers (my fabulous Domestic Goddesses in the making!) but I also trained the son (and some of his friends) of one of my Cape Town clients. She was concerned that all he was surviving on up there was take-aways and wanted me to equip him with some basic cookery skills and a repertoire of quick and easy recipes. We had such fun and it really warmed my heart to see the enthusiasm and enjoyment of a bunch of young men getting involved in the kitchen.

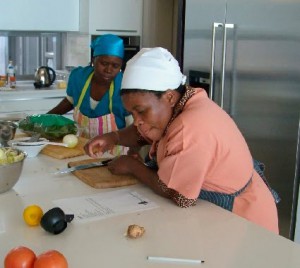
I also did a fun Saturday session with a group of women, planning and cooking a three course meal. Aside from the challenge of getting a group of excited women to all focus at the same time on one task, the day was so energizing and such a joy to be able to demystify cooking methods which can scare many people off.
Things I learned while in Joburg
1 – I LOVE Jourg and want to spend allot more time up there.
2 – It is almost impossible to find ground cumin or garam marsala in a regular supermarket.
3 – Shops mostly only open after 9am, very annoying for an early bird like me.
4 – The quality of fish available is amazing!
5 – Street lights are not a priority and make it hard to see speed bumps and curbs at night. Ouch!
6 – Saffron is more than twice as expensive and very hard to find.
7 – Most of the housekeepers I trained don’t eat pork and often not fish or seafood either. Very hard to train a recipe the person learning can’t taste.
8 – Almost no one seems to be aware that the cups and spoons you regularly use for eating and drinking with are often not the same volume as your 250ml measuring cup and your 5ml measuring teaspoon.
9 – No matter what the dial of your oven says the actual temperate of your oven can differ by up to 20C˚ either way. I now have an oven thermometer and measured every oven I worked with.
10 – It is seriously hard to find good coffee at the coffee shops in the Northern Suburbs.
11 – It feels like the group areas act is alive and well in the Western Cape.
12 – My Butter Chicken recipe is such a WINNER!!! So quick, easy and delicious!
13 – Diletto online deli is great for thank you presents.

Gone fishing?

In case you were wondering if I had gone fishing… not quite. I have been working my butt off and have barely had time to snap a photo let alone write about my experiences of late. This weekend I cooked for a party of 101 people single handed. Before you get too impressed, it was a very simple menu so not really rocket science. I served loads of fabulous Fairview cheeses on Knead bread, garnished with various accompaniments. I made some of my roasted hummus which I served on bread with marinated sundried tomatoes.


For mains I served my express butter chicken on steamed aromatic rice with fresh coriander. To serve 100 people I had to make 25 litres of curry and 25 litres of rice… that was quite an amazing thing to see coming out of my little kitchen. This was followed by two chocolate cakes which were the sum of 6 x Devil’s food cake. Simple, easy, delicious – just time consuming doing it for that many people.

Yesterday was spent crazily preparing for my three week trip to Joburg where I will be training every day, sometimes in the evenings too and one day on the weekend… so I will take loads of pictures and come back with many stories to tell… but I doubt I will get the time to blog.
Today I helped with my god-daughters birthday party and some of the snacks I made with Yvonne her nanny, were mini bacon and cheese quiches and… that devilish chocolate cake again!

All in all I am tiered, happy, excited, nervous and a little sad that I won’t have time to blog, but I will back in three weeks with so much exciting foodie news to tell you all about. I will be tweeting and facebook’ing so if you don’t already follow me – do!
@theklaschwager


